This lab will cover the requirements of your web portfolio. The most complicated part of this process will be completing the process for setting up your public_html folder hosted by HSU. Be sure to carefully follow all of the instructions on this page.
When you have completed the process through HSU's Information Technology Services page, you can begin to design your web portfolio. Your web folder can be accessed from anywhere on campus, and if you download an ftp client (example: Cyberduck, FileZilla) from home as well.
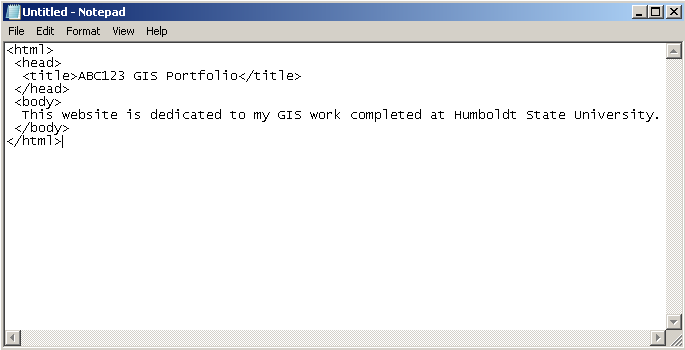
Hyper Text Markup Language (HTML) is a computer language used to create websites. Tags in HTML tell a web browser how to display text and images on a website. You will be learning how to write/edit basic HTML in order to create your web portfolio.
HTML is written using markup "tags", which usually come in pairs, and are the elements that create the components of a page. Tags are surrounded by angle brackets (< >). Example: A start tag for a paragraph = <p>, and the tag that ends the paragraph = </p>. The text between tags is called "element content". Tags are not case sensitive, but a using lower case letters is a general standard.
<p>This is a paragraph</p>
<a href="http://www.humboldt.edu">Humboldt State</a>
Images are not technically inserted into an HTML page, images are linked to HTML pages. The "img" tag creates a holding space for the referenced image. This type of tag is an "empty" tag, meaning it has no closing tag.
<img src="url" alt="description of image" />
For example, a section in a document that will be displayed in black:
<div style="color:#231F20"><p>This is the paragraph inside a "div" tag</p></div>
You can add either bulleted or numbered lists into any HTML document.
1. Enter the following code into your web page's content. The "ol" tag stands for "Ordered List" and the "li" for "List Item". Notice that we have tabbed in the contents of the list to make the HTML code easier to read. This is a good practice to keep the code supportable.
<ol>
      <li>One</li>
      <li>Two</li>
      <li>Three</li>
</ol>
2. You can change the list to a numbered list by just changing the outer tag to an "unordered list" ("ul").
<ul>
      <li>One</li>
      <li>Two</li>
      <li>Three</li>
</ul>
3. You can also put lists inside of lists as shown below. In most cases, you can place HTML tags inside of other HTML tags that allow content.
<ul>
	<li>One</li>
	<ol>
		<li>A</li>
		<li>B</li>
		<li>C</li>
	</ol>
	<li>Two</li>
	<li>Three</li>
</ul>
Without hyperlinks, there would be no web. Since the web is a web of "web pages" hyperlinks are literally the "threads" that hold the web together.
Hyperlinks are added to HTML pages with the "anchor" ("a") tag.
1. You could add the following code to your HTML page to add a link to Google. The "href" indicates the URL that you want the user to be "redirected" to when they click on the link.
<a href='http://www.google.com'>Google</a>
If you are unsure of the URL, it is best to find the page in a browser and then copy the URL and paste it into your code.
2. If you want the link to open a new window, you can add a "target" tag.
<a target='_Info' href='http://www.google.com'>Google</a>
Some web pages will throw up adds in additional windows and these are often blocked by the browser so use of the "target" tag should be limited to when you want to send the user to another web site, outside of your web site.
3. You can also have links within your web page by creating an anchor. Take a look at the table of "Contents" at the top of this page. This is a set of links that jump down to the different sections of this web page. Each section headnig has had an anchor tag placed around it with a special identifier. To try this, first add a bunch of "stuff" to your web page by copying and pasting the content you already have.
4. Add a couple of headings toward the bottom of the page.
5. Now, wrap the heading in an "anchor" tag as shown below. The "id" is an "identification" that will be used to refer to the "anchor" in the link you create.
<a id="Heading1">Your Heading</a>
6. Now add a link to the anchor above by adding the following code near the top of your document. The pound sign ("#") tells the browser that it should look in this page for the anchor tag rather than jumping to another web page. The "id" after the "#" sign must match the one defined in the anchor exactly.
<a href="#Heading1">Jump to Your Heading</a>
You can also provide links to "download" data from web pages.
1. Find a shapefile to experiement with.
2. Create a new folder in your "public_html" folder and give it a nice name that fits the contents of the shapefile and is readable by users. This is the name the user will see when they download and decompress the folder.
3. Right click on the folder and select "7-Zip -> Add to "Your Folder Name.zip"".
4. Add a link like the following to your web page content. The "href" now points to your zipped shapfile. Try it in a browser.
<a href='test.zip'>test</a>
This approach can be used to add downloads for all types of GIS files including zipped Geodatabases. You can also add links to download PDFs of documents to web pages. This is my prefered means to allow users to download GIS data and documents.
Image tags ("img") allow you to insert images into a web page.
1. Find an image on your computer or download one from the web.
2. Copy the image to your "public_html" folder.
The web only supports rasters in JPEG ("jpg"), PNG ("png"), and GIF ("gif") file formats. HTML 5 supports additional dat types but it is not yet supported on all browsers.
3. If needed, convert the file to a JPEG or PNG file using GIMP.
4. Add the following code to your HTML content. The "src" attribute defines the location of the photo.
<img src='MyPhoto.JPG'>
5. You can also add images from the web by just putting the URL for the image into the "src" attrbiute. However, remember that you may need to get permission to use someone elses images in your web page. You can also include images form other folders on your computer but for now, put all the images you wnat to include on a web page in the same folder as the web page.
6. Sometimes, you'll want to make an image larger or smaller. You cna do this by adding a "width" or "height" attribute to the "img" tag. To avoid making images appear distorted, I recommend only adding one of these tags, the browser will then uniformly scale the imgae in the other direction.
<img width='200' src='MyPhoto.JPG'>
It is common to take a photo with a very high resolution camera and then add a small version of the image (a thumbnail) by setting it's size to something very small (about 150 pixels). This is why it takes a really long time to download small images from some web sites. You really need to scale the image down in an image editor (like GIMP) and then use that version of the image as the thumbnail.
6. You can make an "img" tag clickable by adding an anchor tag around it. Try the following.
<a target='_Info' href='http://www.google.com'><img src='MyPhoto.JPG'></a>
7. To make your map accessible to visually impared users, we should always add an "alternate" ("alt") attribute with text that describes what is in the photo.
<img src='MyPhoto.JPG' alt='An example photo'>
Sometimes, you'll want to put a map, or other image, on a web page and allow the user to click on a portion of the image to follow one link and click on another portion of the imgae to follow another link. This can be done by defining an "Image Map" for the image.
W3Schools has an ecellent example of Image Maps at HTML <map> Tag.
There are a number of situations where we want to put up images with map in them and then let users click on the areas in the map to follow links to other content that could be other maps or descriptions of the area. The natural way to create these maps would be to use a shapefile. Unfortunately, this has never been supported in ArcMap except for a Python script that was available in 9 and is no longer available in 10. Fortunately, BlueSpray has a feature that allows you to create image maps.
To complete this, you'll need a shapefile that has an attribute that contains links that you'll want associated with each shape in the polygon.
1. Open BlueSpray.
2. Open a shapefile that contains polygons.
3. Size the "View" to an appropriate size for a web page.
4. Zoom, pan, and size the view until the view just contains the content you want to place on the web.
5. Right click on the View and select ("Transforms -> Export As Raster..").
6. Set the Output to a PNG file in your HTML folder.
This transform only accepts "File" outputs and the web only supports "PNG", "GIF", and "JPG" file formats so this is a critical step.
7. In the "HTML Image Map" tab, check the "Output Image Map" check box.
8. Make sure the correct shapefile is selected.
9. Select the "Links" and "Alts" attributes you want associated with the Image Map.
10. Click OK.
11. Go to the folder where you saved the image and you'll see that next to the image is a file with the same name except "html" has been added. Click on this image. It should open in a browser and you should be able to click on the polygons from the shapefile.
12. Now, open the "HTML" file in NotePad++ and copy the image tag and the "map" tag just below your other content. Note that the "img" tag includes a "usemap" tag to tell the browser which map to use with the image. This allows for mulitple image maps on one page.
13. Take a look at the image map and you'll see that BlueSpray included all the polygons that were larger than one pixel and all the coordinates that were at least one pixel apart. This can make for rather large image maps and processing them can slow down your web pages. You may want to "simplify" the shapefile before genorating the map.
Tables are one of the more complicated elements within HTML but are very flexible and can be used to provide tabular data for the user and control the layout of items on the page.
1. Add the following code into your HTML content and view it in a browser. The "table" tag starts the table. "tr" stands for "table row" and defines one row of the table. "td" stands for "table data" and defines cells within a row of the table.
<table>
	<tr>
		<td>Cell 1,1</td>
		<td>Cell 2,1</td>
	</tr>
	<tr>
		<td>Cell 1,2</td>
		<td>Cell 2,2</td>
	</tr>
</table>
2. The default table does not contain a border so you might want to add one by adding the "border" attribute to the "table" tag.
<table border='1'>
3. The problem now is the double lined border and the amount of space around the text. The "cellpadding" attribute will add pixels around the contents of each cell while the "cell spacing" attribute will control the width of the border. Try the following.
<table border="1" cellspacing="0" cellpadding="2">
4. It is also typical to make the first row of the table contain "column headings". these are added with the "table heading" or "th" tag.
<table border='1'>
	<tr>
		<th>Column 1</th>
		<th>Column 2</th>
	</tr>
	<tr>
		<td>Cell 1,1</td>
		<td>Cell 2,1</td>
	</tr>
	<tr>
		<td>Cell 1,2</td>
		<td>Cell 2,2</td>
	</tr>
</table>
5. Another common desire is to make the table and specific width. You can make the table either a percent width of the web page like "100%" or a specific number of pixels like "100px". The percent is more uniformly supported on browsers.
<table border='1' width='100%' cellspacing='0' cellpadding='2'>
	<tr>
		<th>Column 1</th>
		<th>Column 2</th>
	</tr>
	<tr>
		<td>Cell 1,1</td>
		<td>Cell 2,1</td>
	</tr>
	<tr>
		<td>Cell 1,2</td>
		<td>Cell 2,2</td>
	</tr>
</table
Your final web page submission should include a minimum of the following:
You can create a single page with all of this content, or link to multiple web pages as you see fit. Be creative, as this is an example of your work and professionalism that can be shared with potential employers in the future.
You can work on your web page in a number of ways. If you have access to Adobe Dreamweaver, it is a great software that lets you edit your page and see a live view at the same time. There are many great online tutorials if you need some help using this software.
Note: I no longer recommend KompoZer because it changes the HTML without telling you.
If you feel comfortable with editing HTML, you are more than welcome to write your page from scratch. If you are less than comfortable with HTML, feel free to use a template to get you started. Just be sure to include everything that is required in the "web portfolio content" section above.
HTML Tutorial: http://www.codecademy.com/courses/html-one-o-one/0/1
HTML "Cheat Sheet": http://www.wikihow.com/Sample/HTML-Cheat-Sheet
HTML from Scratch: http://www.2createawebsite.com/build/build-html-website.html
HTML Templates: http://templated.co/
© Copyright 2018 HSU - All rights reserved.