This lab will show you how to create a new tool for ArcGIS Pro. Note that this is different from ArcMap. For this exercise we'll be creating a tool that does a buffer operation. While this is not that exciting, it does allow us to create a simple tool.
Note: Python has some capabilities to create user interface elements like dialog boxes but ESRI no longer supports having developers add extensions to ArcGIS that have complex user interfaces. For now, use the user interface elements provided by Esri and we'll talk about using other UI elements in the future.
Note: Make sure you have the Wing IDE setup to use the python.exe file for ArcGIS Pro as shows in the schedule.
Note: If you want to distribute your tool, DO NOT create your project under "Documents". This folder may be hidden from you. You may not be able to distribute it because you won't be able to find it! Instead, create the project under a folder you can easily find.
3. Go to the folder that was created for the project and you should see a ProjectTest2.tbx file. This is the new project's toolbox.
Scripts for toolbox tools are very similar to regular Python scripts we've been created. The major difference is that you'll need to read in the parameters the user sets in the tool dialog. These are passed through "parameters". Your Python script will read the values of the parameters into variables you can use in your script. The code below will read in the first parameter show it as a message in ArcGIS. Save the code into a new file in your project folder.
import arcpy

InputLayer=arcpy.GetParameterAsText(0)

arcpy.AddMessage("InputLayer="+InputLayer)
1. Back in ArcGIS, select the "Project" tab on the right side of ArcGIS Pro.
2. Open "Toolboxes". You should see the toolbox within the project folder.
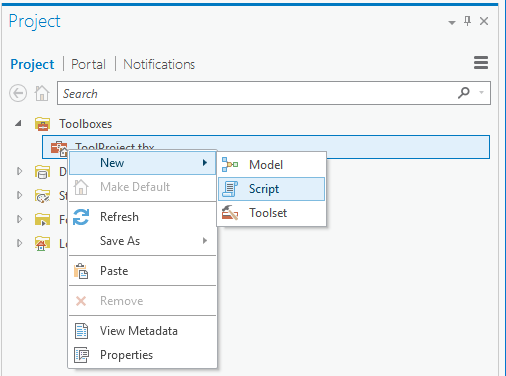
3. Open the toolbox that has your project name and select "New -> Script".
1. Right click on your tool and select "Properties". This will open the dialog to edit the parameters. Note that you do not want to click "Edit".
2. In the parameters panel, Data Type and select Feature Layer. This will allow the user to select vector data layers that are already loaded into ArcGIS.
3. In the next line, add a Label for an Attribute and set the Data Type to Field. This is how you add a selection for an attribute column in a tool.
4. We need to let ArcGIS know which layer to get the attributes from so click on the Dependency entry and select Input Layer. This links our Input Layer to the parameter Attribute.
5. Add another parameter, Output Layer and select Feature Layer for the data type
6. For the Output Layer, we need to let ArcGIS know that this is a layer that will be saved rather than one that already exists. With the Output Layer selected, click on Direction in the Parameter Properties and select Output
7. For the last parameter name it Distance and then select String for the data type
Note: You might have considered "Double" or another numeric type for the distance. You can do this but if you take a look at the ESRI help documentation you'll see that they always have all the parameters as strings. This is not the best code practice but it does allow you to add a unit to the distance such as "100 meters".
8. Click "OK"
9. Open the tool, add appropriate parameters and run it to make sure it works.
10. Now, back in Wing, add lines to get and output each of the parameters and add them to ArcGIS as messages. Save the script and make sure it still works.
11. To finish our script, add a call to Buffer the input based on the Distance specified.
12. Make sure this works and you'll have completed your first ArcGIS tool.
You probably noticed that there were a lot of data types available. Below is a list of the ones you may commonly use.
Notice that the only integer type is "Long" and the only floating point type is "Double".
It's actually very easy to share simple tools in ArcGIS. Just "zip" the entire project folder. Then, unzip it. To access the tool from another project, right click on Toolboxes and select "Add Toolbox". You'll want to let the user place the tool anywhere in their folder structure so check the option for using relative paths and make sure the script path only includes the name of the script file. You'll also want to make sure that your Python script only uses paths provided by the user (or by ArcGIS like the workspace).
No program is completed without documentation. Since tools for ArcGIS Pro are typically for non-programmers, it is very important to have good documentation. To add documentation, right click on your tool and select "View Metadata". Then, from the "Home" tab, select "Edit". Note that the online help for this directs you to a tab that does not exist. You should now be in the metadata editor with your tool's documentation displayed.
The "Syntax" entries are actually for your parameters. You should add an "Explanation" (incorrectly named "Dialog Explanation" in the metadata editor) for each parameter to let the user know how to set the parameter. You can even add parameter names that include restrictions to the parameter like:
Output path for the image (only 'png' and 'jpg' files are supported):
Make sure your Python script provides good error messages that help the user to determine what has gone wrong. You're probably already aware that there is nothing more frustrating than running a software program and receiving a message that you can't understand or no message at all when a problem occurs. Now it is your turn to either be the developer that everyone values or hates!
There are a lot of versions of ArcGIS out there and there will only be more in the future. There are also a lot of different operating systems, versions of Python, and different file formats. Make sure you test your tools on the variety of options that you think users will have and beyond! Also, document in your tool what it works with and what it does not. This will save you and your users many frustrations.
ArcGIS has a habit of crashing and having to have it's processes terminated when creating tools. Most users will not even know how to kill a process let along feel okay about it. They will probably blame your tool instead of ArcGIS (even though your tool should not be able to crash ArcGIS) so you need to really test your tool even to the point of trying to break it and make sure it is as strong as possible.
Note: Developers are notoriously bad at testing programs, especially their own.
ArcGIS Desktop Help: Creating Custom Tools
A quick tour of creating custom tools
© Copyright 2018 HSU - All rights reserved.