This tutorial will get you started programming in Python really quickly. We'll learn in the "Wing IDE" application which makes developing Python much easier than the standard IDLE environment (more on IDLE later).
If you have installed ArcGIS 10 or above, then you should already have Python installed on your computer. If you don't have ArcGIS installed, then follow the instructions below to install Python.
Note: ArcGIS installs a custom version of Python that has some compatibility problems with Python libraries. We'll talk more about this later.
Some Python developers will write their entire programs in a command-line interface or one of the simple Integrated Development Environments (IDE) such as IDLE. Using a full function IDE such as a Wing makes writing and especially debugging Python programs much easier for new programmers so Wing is used throughout this book. There are also other full-feature IDEs, such as Eclipse, that you can use to write Python. However, these IDEs are typically much more complicated than Wing so they are only recommended if you have experience with using them.
Note: You will need at least the personal version of the Wingware IDE to see the functions available within ArcGIS and other packages as you type. This is called "code completion".
Start the Wing IDE now. You will probably receive a message asking you to either enter a license or continue with a trial. If you have purchased a license, you can register it now. Otherwise, continue with the trial version. You may also see "tips" appear. These can be valuable when you are working with Wing later but just close these dialogs for now.
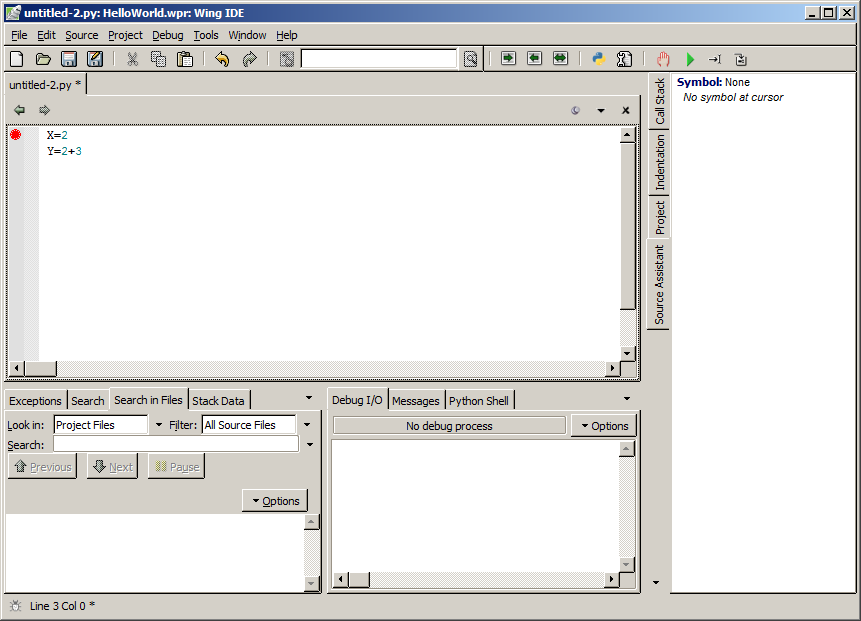
Take a moment to look around the interface and note the location of the items identified in figure 1. Note that your version of Wing may look a little different based on the version and your user settings but the interface elements will be the same.
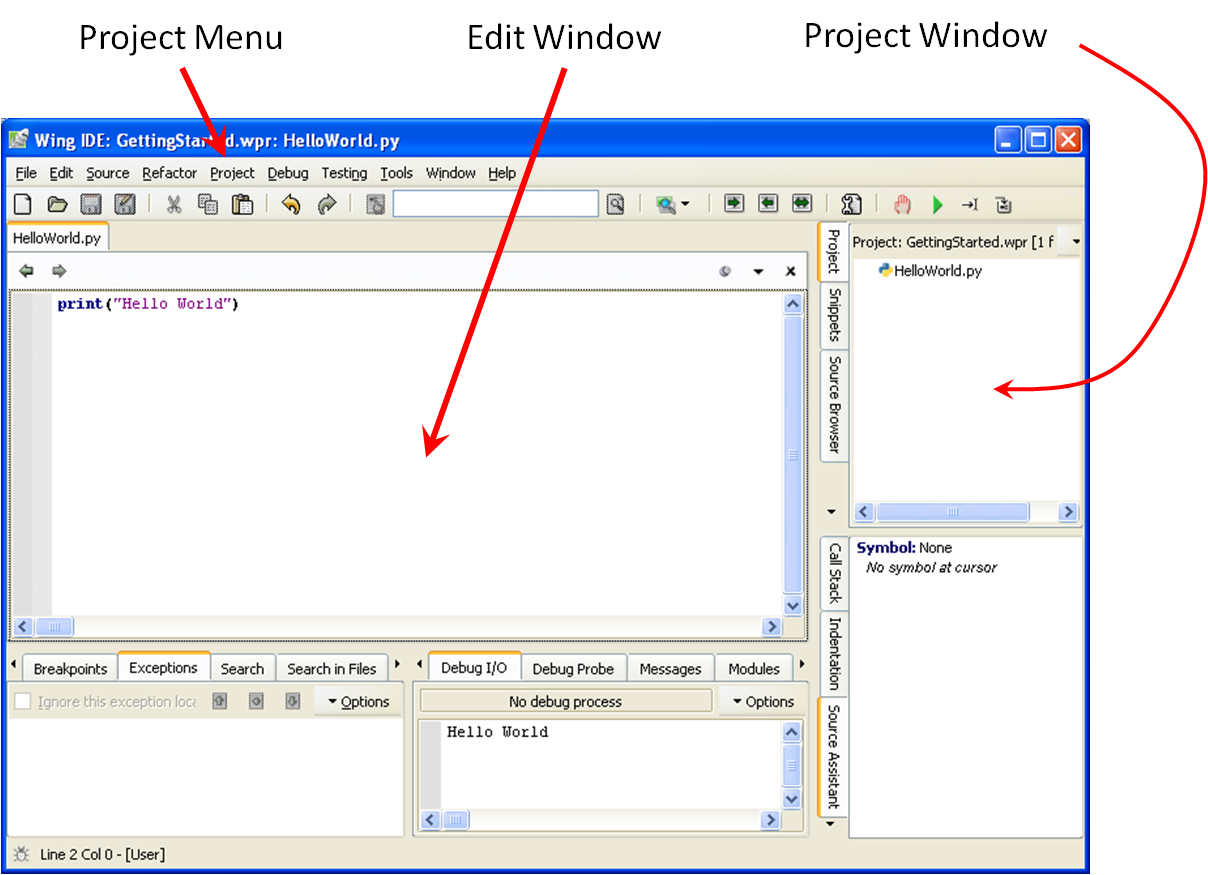
Figure 1. The Wing IDE application interface with the first panels that you'll be using identified.
Since you can have a number of different versions of Python on your computer, it is recommended that you set the path to the version you want to be using. Otherwise, Wing may select one you do not want it to use!
We'll get started by creating a new file to print out information.
print("Hello World")
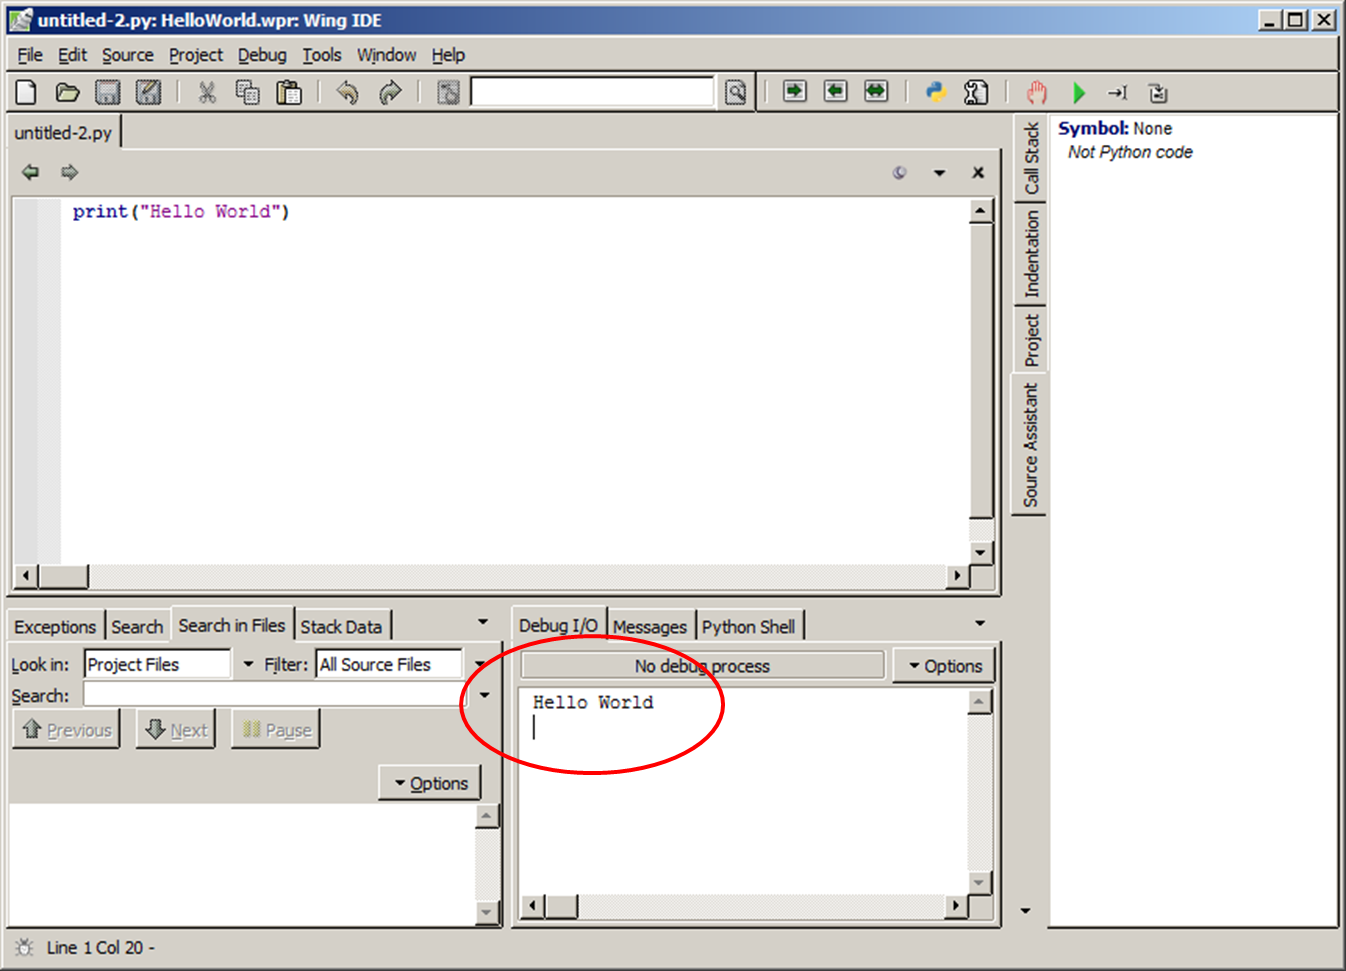
You just used the "print()" function to write out a "string" of text to the Debug I/O panel. This is a very powerful way to see what your programs are doing and you'll use print() a great deal. For now, you can type anything you want between the quotes inside the parenthesis and see it typed out. Try some of the examples below and then make up at least 5 of your own. Change the text in the print function and press the "run" button and verify that you see your output in the "Debug I/O" panel.
print("Computers are just machines")
print("I have to make sure each statement is correct")
print("Fortunately, the IDE will help me do this!")
You've now printed out some "strings". Strings are sequences of "characters" which are coming from the keyboard and into the computer as you type them. Strings are used to input text into programs and output text from programs. Python itself is a "text-based" language that the Python interpreter (another program) converts into a language the computer understands (pretty cool eh?). There are a number of other data types and also more complex structures that combine these data types.
Type the following and press run:
print(2+2)
You should see "4" appear in the Debug I/O panel. Python allows us to perform a wide variety of mathematical operators just by typing them. The plus ("+") and minus ("-") symbols are for additional and subtraction. The asterisk ("*") is used for multiplication and the back slash ("/") is used for division. Try the following and then try some of your own:
print(10*13)
print(20/2)
These numbers are all integer values or values that do not have anything after the decimal.
Floating point numbers allow us to have fractional values. Try the following and then try some of your own.
print(2.3+1.2)
print(2.3*2)
print(2.1*3+2-0.2)
Wing includes a powerful tool to help you debug your programs and it makes a great tool to learn programming.
On the left side of the Editor Window, you'll see two gray bars. Click next to one of your lines of code and in the bar on the far left as below.
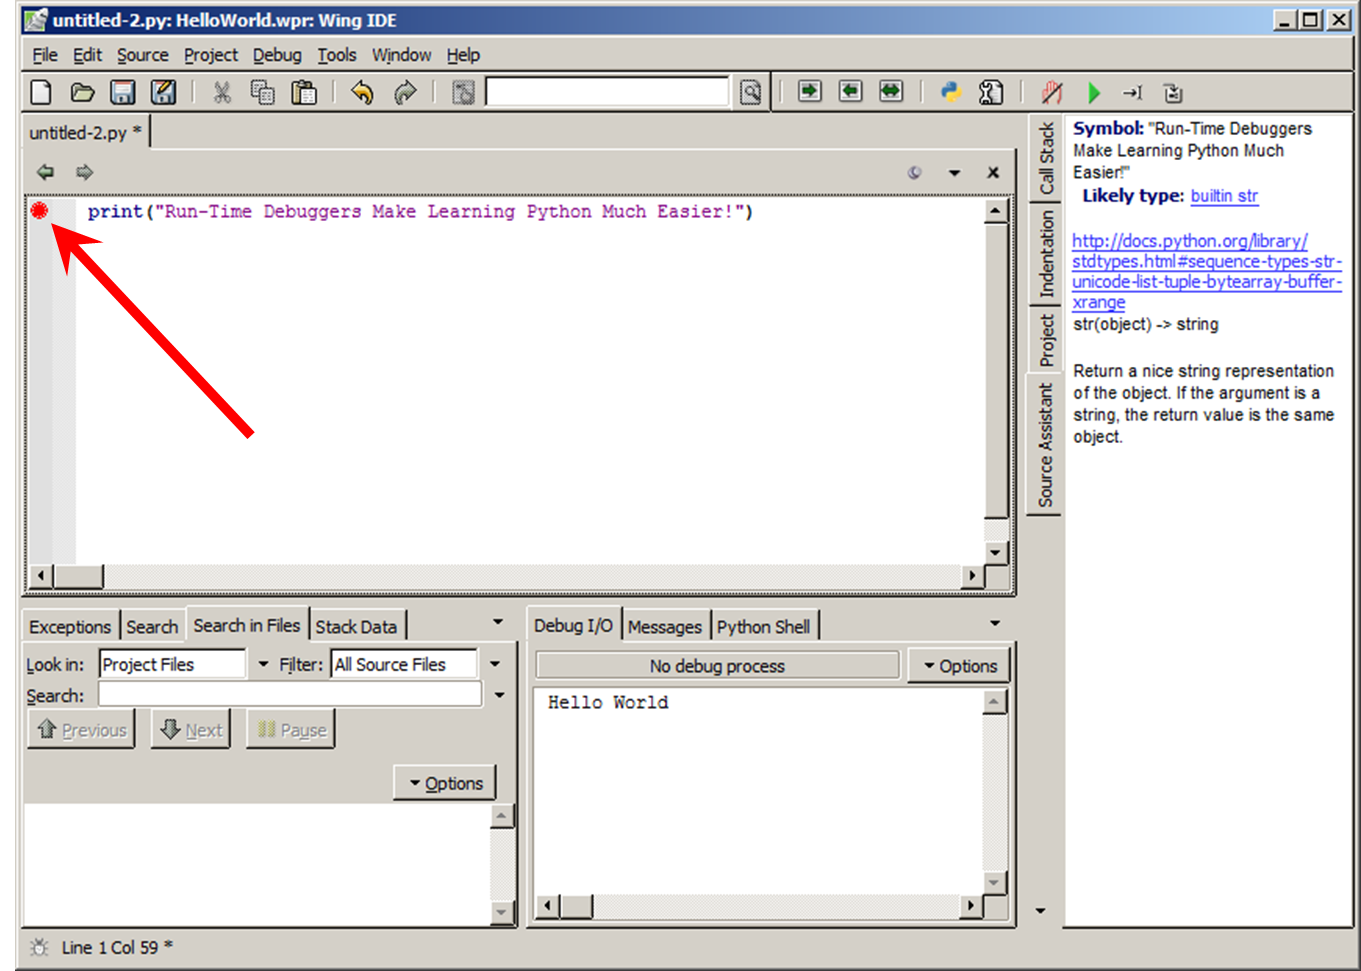
Now, run your program and a red bar should appear as below.
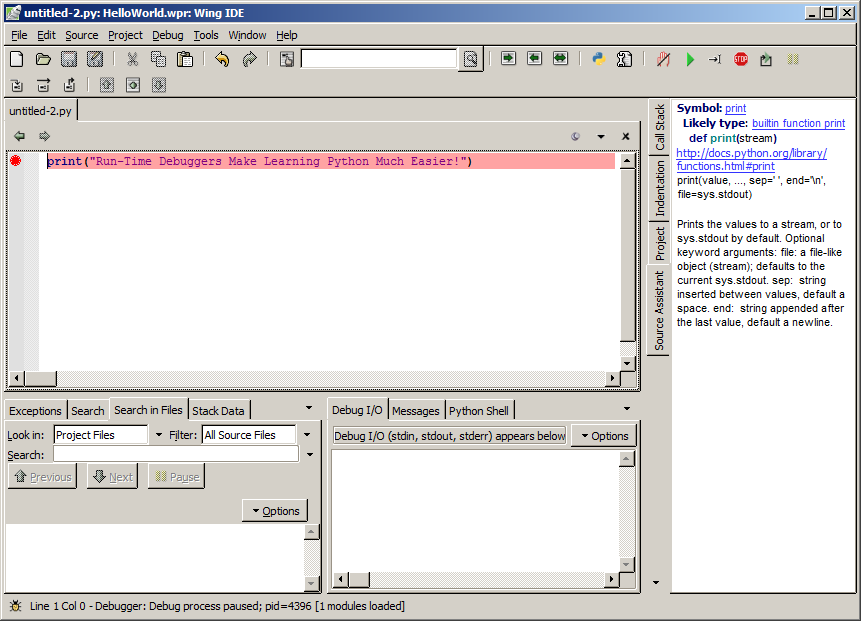
This indicates that the IDE has "stopped execution" at the line where you placed the breakpoint. Notice that the "Debug I/O" window is empty because the line has not yet been executed. Click the run button again to have your program finish.
Variables are how we store values within a program. Python is an "un-typed" language which means it is very easy to create variables. For example, try:
x=10
print(x)
Now that we can declare variables, we can perform operations on them and then print out the results. Try:
x=10
y=3
z=x*y
print(z)
We'll be using variables in almost all of our scripts so spend some time creating different variables and doing simple arithmetic. The standard symbols work including; +, -, *, /, and ^.
Enter a couple of lines of arithmetic and set a breakpoint at the first line similar to the window below.
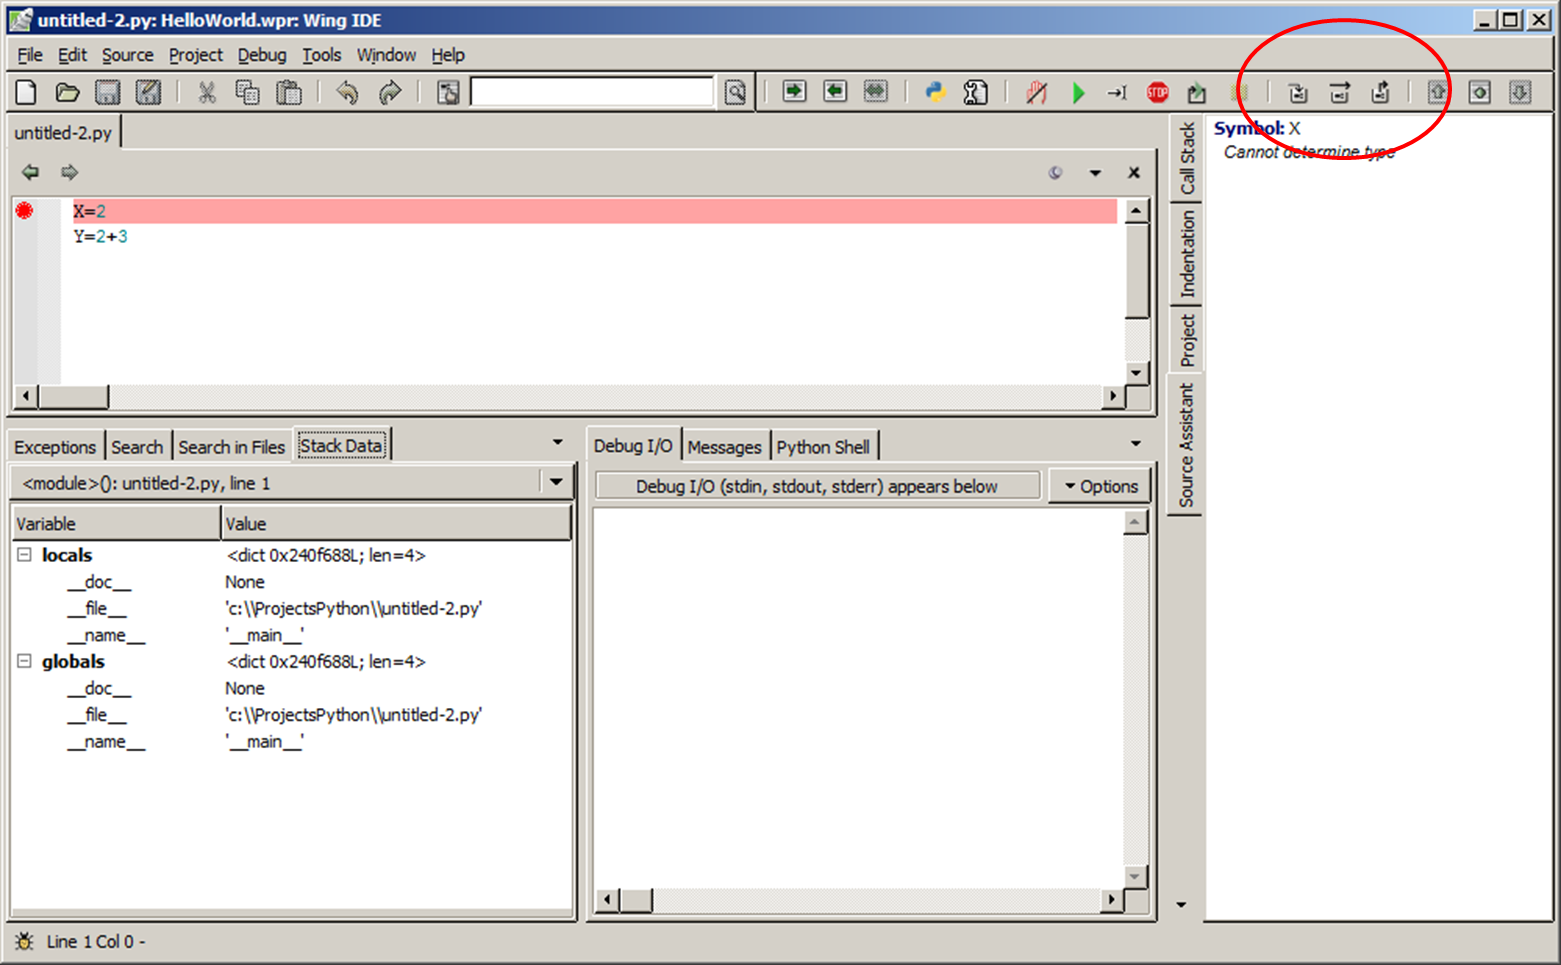
Press the run button and then take a look at the "Stack Data" tab in the bottom left window. You'll see two entries in the "tree" labeled "locals" and "globals". If these are not "open", click on the plus sign to the left of the labels. In both "locals" and "globals" you should see entries for "__doc__", "__file__", and "__name__". Don't worry about these entries for now.
Notice that while your program's execution has been "paused" by a breakpoint, there are additional buttons added to the IDE. Three of these allow you to "step" through your program, line by line. Click on the button in the middle of the ones circled below to "single-step" through one line of your program. The one in the middle is called the "step-over" button, we'll examine the other buttons when we learn about functions a little later.
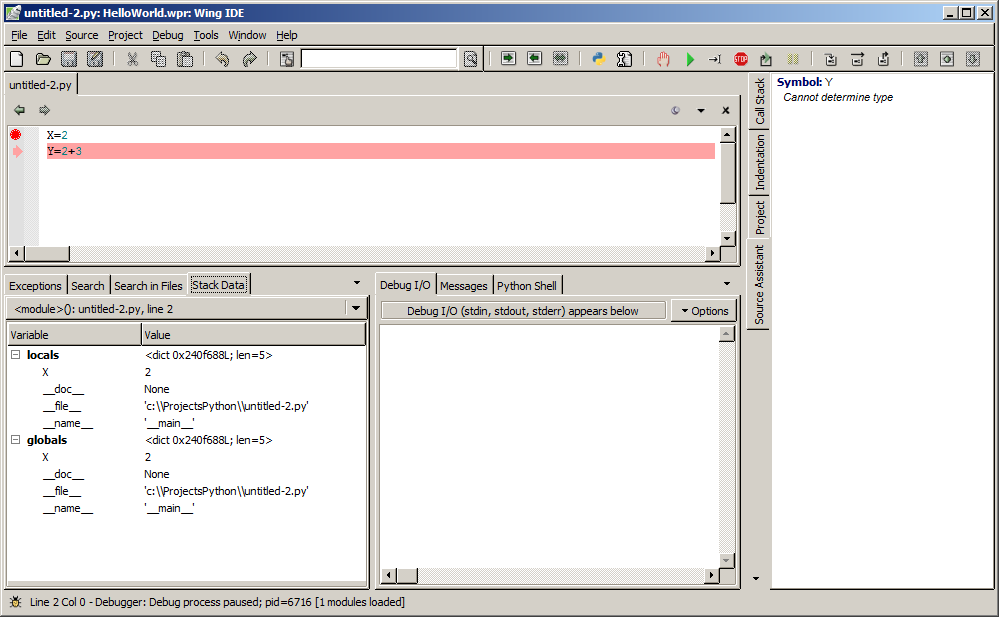
The red bar showing the next line to execute should move down to the next line. This means that Wing has executed one line of your program. Now take a look at the "Stack Data" tab and see if anything has been added. You should see your first variable appear in the "Variable" column on the left and the value you set it to in the "Values" column. Single step again to see the second variable appear and so on.
Important: In just a few more chapters, you'll be writing Python very quickly. However, your programs will then have problems and you'll need to quickly stop, set some breakpoints, and see what is wrong. Without having the ability to set breakpoints and examine variables as they change on each line of code, you can spend days trying to find even simple programming errors.
Write some more lines of code at this point and use breakpoints and the "step-over" button to see how they are created and changed in your programs.
As we mentioned earlier, computers are just machines and if we make a mistake in the syntax of our scripts the IDE will let us know. Type the following into your script and run it:
print("Hi"
At the lower-left of the IDE you should see some text highlighted in red and the "Exceptions" tab should be selected. Errors in Python are called exceptions. Notice that other than giving the line number where the error occurred, the error messages are not very helpful. This is pretty typical of errors from interpreters in all languages. Add the missing parenthesis to the end of the "print" function and run the program again. The exception should go away but watch for them in the future and fix them before moving on.
Just as important as the scripting we create is the documentation that goes with the scripts. If you don't add documentation you'll quickly find yourself wondering what the scripts do! Imaging what would happen if you didn't comment your code and you don't come back to it for a year or more. You'd probably have to rewrite the script from the start.
Comments allow us to add text into our programs that the Python interpreter will just ignore. Just type a pound sign ("#") and then your comment like the following:
# this is a comment
The Wing IDE is setup initialiy to use either tabs or spaces for indentation. You will want to set it up to use just tabs and make them 4 spaces each. To do this:
If you do not set this, you will get lots of messages about problems with tabs and spaces. Even if you set it, you'll get code from other developers that gives you warnings about issues with tabs and spaces. The way to fix these files is to use the "Indentation Manager" next to the "Source Assistant" in the Wing IDE to convert everything to tabs with 4 spaces.
© Copyright 2018 HSU - All rights reserved.