
Aerial Photography
Introduction
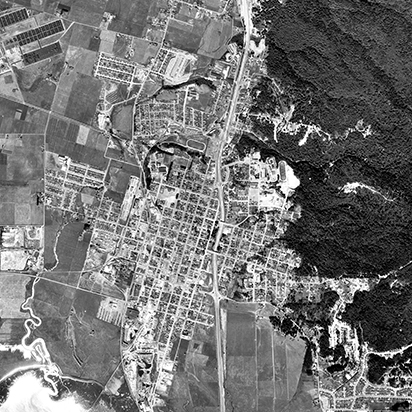
Aerial photography is one the earliest forms of remote sensing and is still one of the most widely used and cost effective methods of remote sensing. Before the development of multispectral sensors and computers, people were using traditional photography to capture aerial images. Since its inception, aerial photography has gone from balloons and kites, to airplane, satellites and now unmanned aircraft systems (UAS). While the quality, resolution and platforms have evolved, aerial photography is still a cornerstone of remote sensing and is becoming cheaper and more accessible than ever. Aerial photography is useful both for regional analysis and for evaluating specific sites. It can also provide a historical perspective that allows us to view changes in landscapes overtime.
As we learned earlier in this course, the first aerial photographs were taken from balloons, kites and even pigeons. Aerial photography quickly expanded with advances in aeronautics. The military potential of aerial photography was obvious and aerial photography was widely used in WWI and WWII. The first non-military aerial photography programs were developed in the 1930's as part of the Agricultural Adjustment Act. In the United States the U.S. Department of Agriculture (USDA) has been involved in the acquisition, use and distribution of aerial photography for more than 65 years. Aerial photography has numerous applications and is used by catographers, engineers and scientists to analyze everything from urban expansion to the impacts of climate change.
History in the U.S.
In the United States the U.S. Department of Agriculture (USDA) has been involved in the acquisition, use and distribution of aerial photography for more than 65 years. The earliest aerial photography in 1937 by USGS and Farm Security Agency. Later the National Aerial Photography Program (NAPP) and the National Digital Orthophoto Program (NDOP) were created to take a more imagery of farm lands on a national scale and provide consistent coverage.
National High Altitude Program
The National High Altitude Program (NHAP) was an interagency federal effort coordinated by the USGS which operated from 1980 to 1989. The goal of the program was to provide cloud free aerial images of the entire lower 48 states. The images were acquired at 40,000 ft. elevation. The NHAP collection includes black-and-white aerial photographs at a scale of 1:80,000 and color infrared aerial photographs at a scale of 1:58,000 Learn More About NHAP.
National Aerial Photography Program
The National Aerial Photography Program (NAPP) program began in 1987 as a replacement for NHAP, with the objective of acquiring complete uniform photo coverage of the conterminous 48 States over a 5 to 7 year period. The NAPP photos include black-and-white and color infrared images and all images have a scale of 1:40,000 (1 inch equals about 0.6 miles). Learn More About NAAP.
National Agriculture Imagery Program
Starting in 2003 the National Agriculture Imagery Program (NAIP) and acquiring aerial imagery during the agricultural growing seasons in the continental U.S. A primary goal of the NAIP program is to make digital ortho photography available to governmental agencies and the public within a year of acquisition. NAIP imagery has a resolution of 1-meter ground sample distance (GSD). Learn More About NAIP.
Types of Aerial Photography
Angle of Photo
Aerial photographs may be taken in vertical, low-oblique or high-oblique positions. Most of the air photos we use in remote sensing are vertical photographs.
Verticle
Vertical photographs are taken looking straight down. Vertical (or nearly) angle to the ground surface, i.e. camera pointed straight down. Vertical photograph are often used in cartography and photogrammetry.
Oblique
Any aerial photographs taken at an angle are known as oblique photographs. There are two types of oblique photographs:
- High-oblique -Shows the surface, the horizon, and a portion of sky.
- Low-oblique - Shows only the surface, the horizon is not show.
Film or Digital
Early aerial photography was film based and remained the dominant medium throughout the 20th century until the development of digital cameras. There are several different types of film commonly used in aerial photography.
Film Types
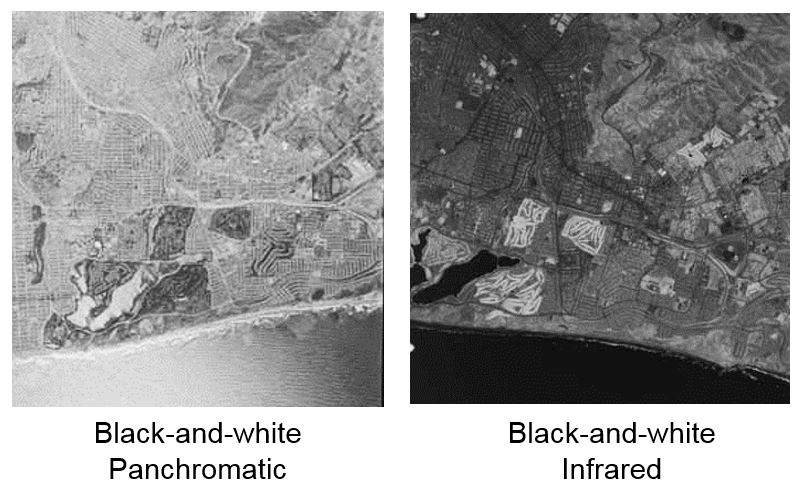
Black and White Film
- Black-and-white panchromatic (B/W) film primarily consists of a black-and-white negative material with a sensitivity range comparable to that of the human eye. It has good contrast and resolution with low graininess and a wide exposure range.
- Black-and-white infrared (BIR) film, with some exceptions, is sensitive to the spectral region encompassing 0.4 micrometers to 0.9 micrometers. It is sometimes referred to as near-infrared film because it utilizes only a narrow portion of the total infrared spectrum (0.7 micrometers to 0.9 micrometers).
 Color Film
- Natural color (also referred to as conventional or normal color) film contains three emulsion layers which are sensitive to blue, green, and red (the three primary colors of the visible spectrum). This film replicates colors as seen by the human eye.
- CIR (color infrared) film, originally referred to as camouflage-detection film, differs from conventional color film because its emulsion layers are sensitive to green, red, and near-infrared radiation (0.5 micrometers to 0.9 micrometers). Used with a yellow filter to absorb the blue light, this film provides sharp images and penetrates haze at high altitudes. Color infrared film also is referred to as false-color film.

Digital
Digital photography uses CCD (charge-coupled device) or CMOS (complementary metal-oxide semiconductor) sensor to capture the image, as opposehd to an exposure on photographic film. Both sensors capture light and convert it into electronic signals. The captured image is then digitized and stored as a computer file ready for digital processing. Digital has replaced traditional film photography in many applications, for example the NAIP imagery collected by the USDA is now acquired entirely with digital sensors
Information on Aerial Photographs
Often there is a significant amount of information provided on the aerial photograph itself. This can include:
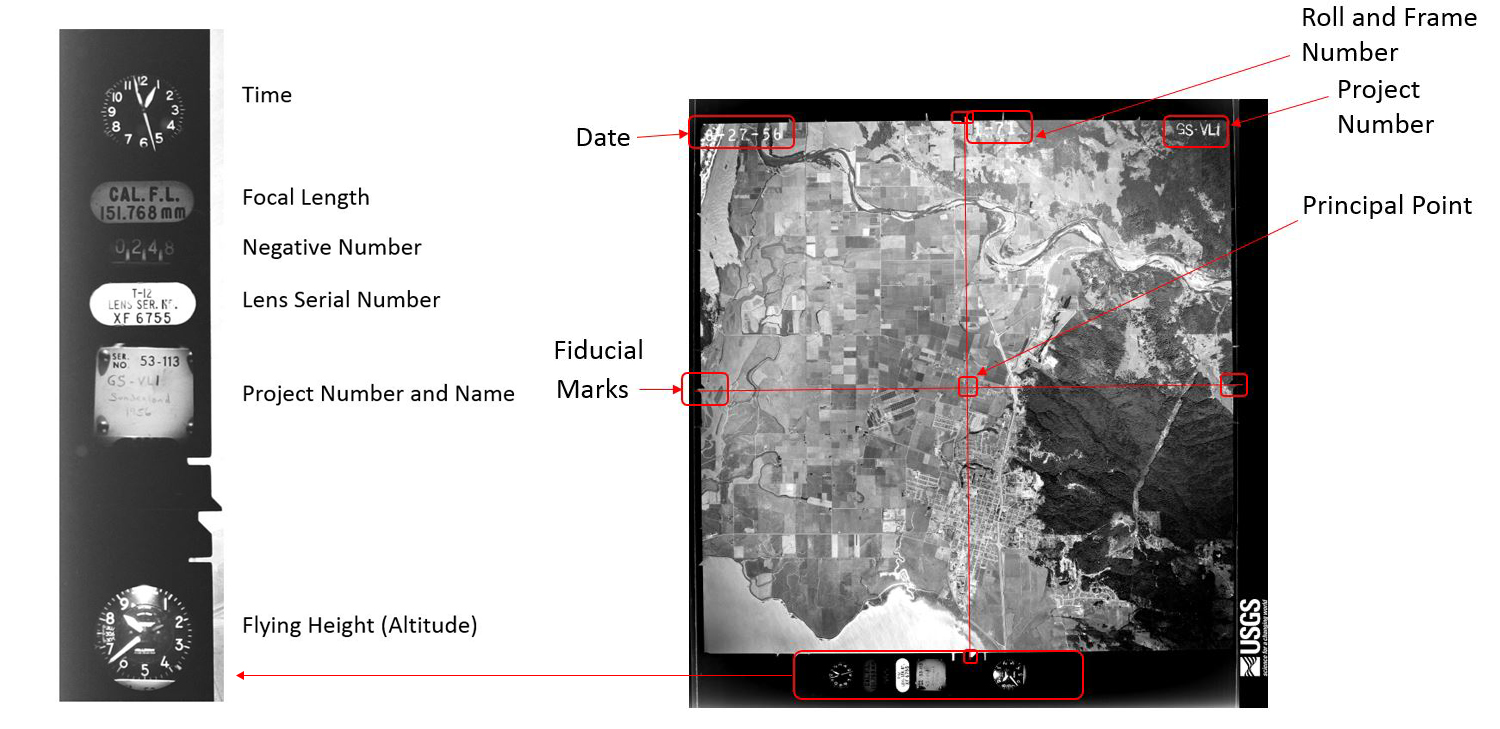
- Date
- Mission name and details
- Roll & frame number
- Fiducial marks
- Altitude
Click on the aerial photo to the right to enlarge the image
Determining Scale
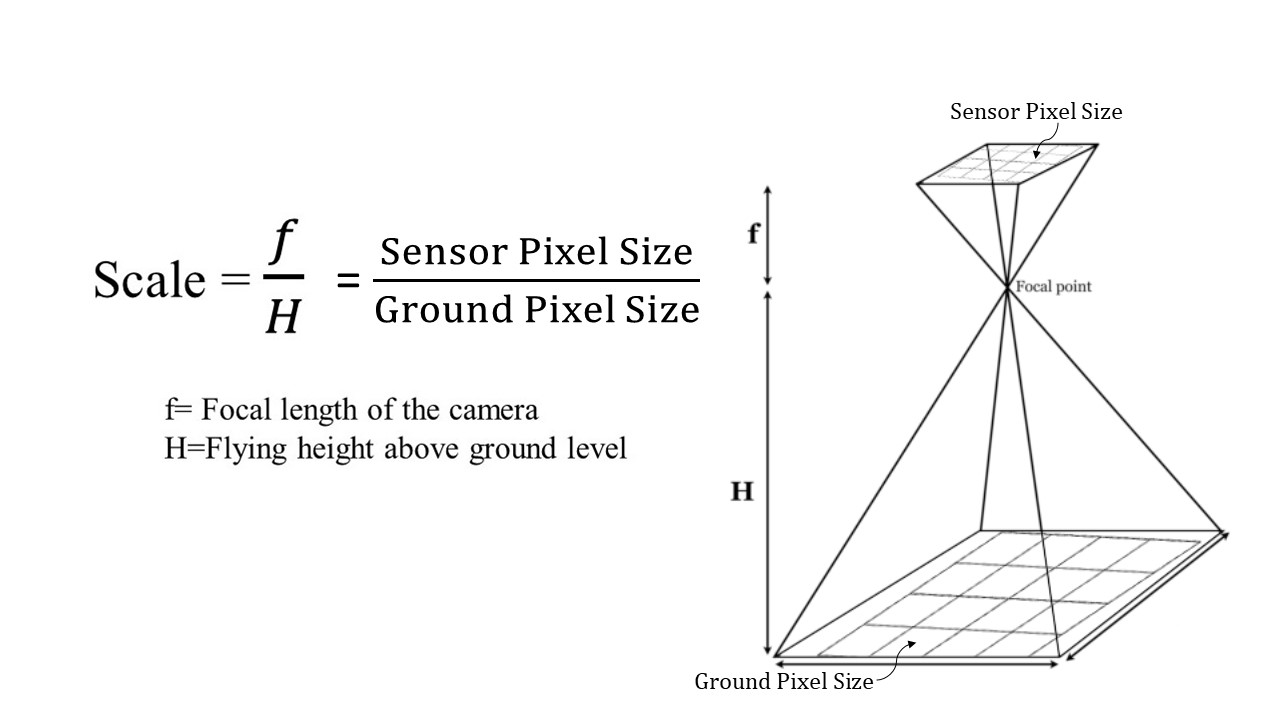
The scale of an aerial photograph depends on the specific camera characteristics (focal length) and the flying height at which the image was captured. There are several methods for calculating the scale of an aerial photo. Which method you use depends on what information is already known.
Focal Length and Field of View
The scale of a photograph is determined by the focal length of the camera and the flying height above the ground. The focal length is the distance from the middle of the camera lens to the focal plane. Focal length is precisely measured when cameras are calibrated and is typically expressed inn millimeters (mm). The focal length of a lens determines the magnification and the angle of the light ray. The longer the focal length, the greater the magnification of the image. Short focal length lenses cover larger areas. The area captured by a camera is known as the Field of View (FOV), which is typically expressed in degrees. Field of View is a function of the focal length of the lens and the size (sometimes called format) of digital sensors.
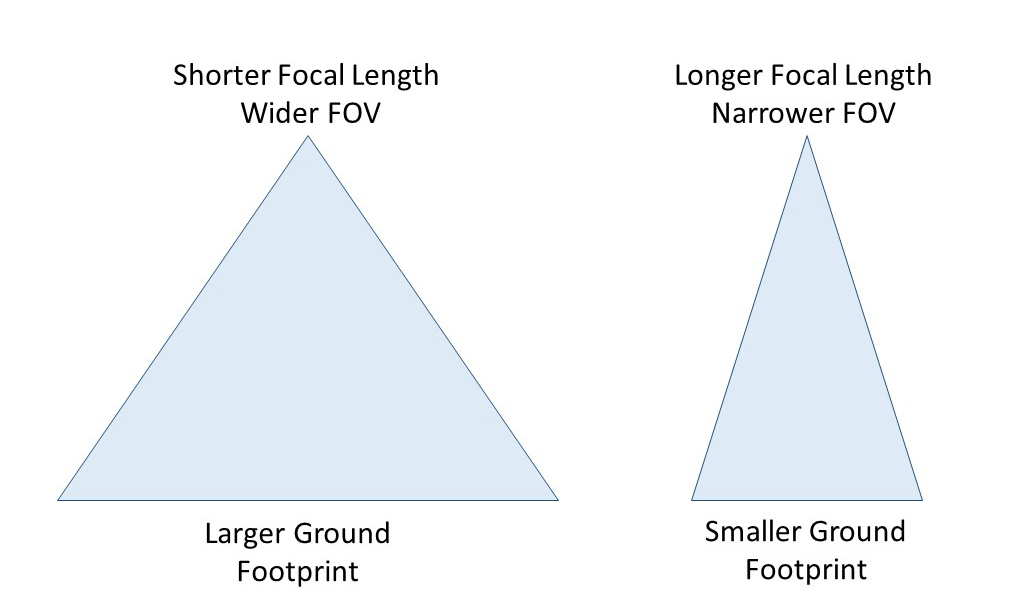 Shorter focal lengths have wider field of views, while longer focal lengths have smaller field of views. Therefore a camera lens with a longer focal length will produce an image with a smaller footprint compared to that of a shorter focal length.
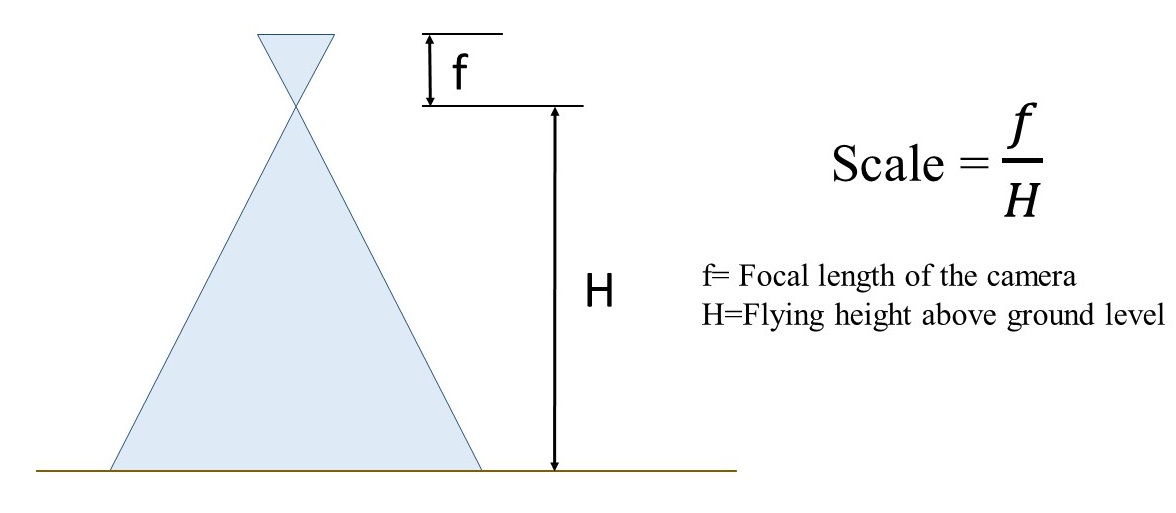
The scale of a photo is equal to the ratio between the camera's focal length and the plane's altitude above the ground level (AGL) being photographed. If the focal length and flying altitude above the surface is known, the scale can be calculated using the following formula:
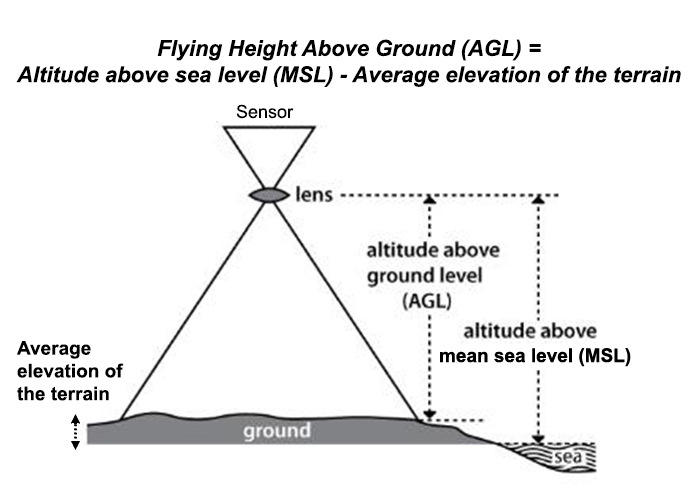
Flying Height Above Ground Level (AGL) vs Above Mean Sea Level (MSL)
In all of the scale calculations, it is important to know the flying height above the surface or above ground level (AGL). Sometime the altitude above sea level or MSL is given and you may need to estimate the average flying height above ground. For example, the GSP on a unmanned aerial vehicle (UAV) may record the altitude or height above sea level and not above ground level (AGL). To estimate the AGL, you will need to determine the average elevation of the terrain and subtract that from altitude above sea level. This will give you the average flying height above ground.
Example:
A camera with a 152 mm focal length takes an aerial photograph from a flying height of 2280m above ground level. What is the scale
of the photograph?

Feature of Known Size
The scale of an aerial photo can also be determined if an object of a known ground size appears in the image. One method is to find a feature of a known size (e.g. football field or standard event field) in the photograph to calculate the scale. The scale can be determined by measuring the distance or length of the feature on the photo and comparing it to the real-life or ground distance.
Example: You measure the straight length of a track to be 2.5 mm and you know that the real ground distance is 100 meters, what is the scale of the photo? 
Ground Sampling Distance in Digital Photographs
Ground Sampling Distance (GSD) refers to how big each pixel is on the ground. This linear measurement represents the ground width of a pixel and is typically expressed in meters. This is effectively the scale of a digital image. The size of the sensor, lens focal length along with flying height above the surface determines the GSD of an image.
 Similar to a film camera, the Ground Sample Distance or Ground Pixel Size relates to the flying height above ground and the camera lens (focal length) and sensor characteristics.
 In order to determine the GSD, you need to know the flying height above the ground (not above sea level) and the digital camera sensor size and lens focal length. This information is typically available from the camera manufacturer.
Focal Length for Digital Cameras
The focal length for digital cameras is similar to that of analog film camera. Focal length will typically be expressed in millimeters (mm). There may be a 35 mm equivalent focal length and real focal length listed for digital cameras. When determining GSD or other calculations you will want to use the real focal length.
Digital Camera Sensor Dimensions and Pixel Counts
Digital cameras use CCD (charge-coupled device) or CMOS (complementary metal-oxide semiconductor) to capture light and convert it into electronic data. The camera sensor is a rectangular grid containing millions of tiny square pixels. Each of these pixels detects and records the amount of light received. Sensors are defined by their physical size (surface area for capturing light information), the dimension of the pixels and the number of pixels in the sensor. The physical size of the sensor may be expressed in inches or centimeters. The dimension or width of each individual pixel are usually expressed in micrometers, as each pixel on the sensor is extremely small. The sensors pixels sizes vary between cameras, but are typically between 1-2 micrometers. The number of pixels a sensor has is sometimes referred to has camera resolution. For example, a camera may have a sensor with dimensions of 3000 x 2000 pixels. That means that the rectangular grid of the sensor is made up of 3000 pixels wide and 2000 pixels tall, for a total 6 million pixels or 6 Megapixels.
Calculating Distance and Area
Distance and Length
If the scale of an aerial photograph is known distances lengths and areas of features can easily be calculated. You simply measure the distance on the photo (photo distance) and multiply the distance by the scale factor. Remember that scale is always equal to the ratio of the photo distance to the ground distance.
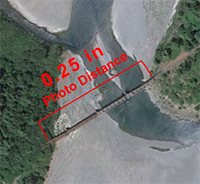
Example:
The scale of an aerial photograph is 1:15,000. In the photo you measure the length of a bridge to be 0.25 inches, what is the length of the bridge in feet in real life?

Area
It is important to remember that area is measured in square units. To determine rectangular area it is length multiplied by width, so if you measure both and convert these distances remember that if you are multiplying them together the resulting units are squared. For example, if an area is 100 meters by 500 meters, it is 50,000 square meters. Now if you wanted to change that number to square feet you wouldn't multiply by 3.28 (there are 3.28 feet per meter), you would multiply by 10.76 (3.28 x 3.28).
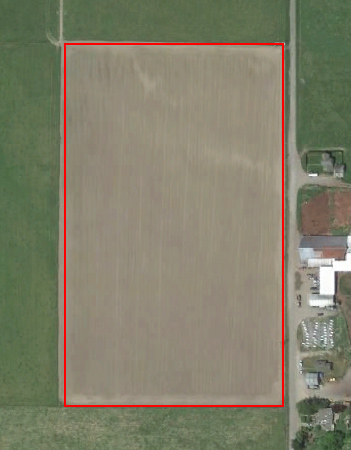
Example:
An aerial photograph has a scale of 1:10,000. On the photo, the length of a field is measured as 10 mm and the width 7mm. How big (in Hectares) is the field in real-life? Note that 10,000 square meters = 1 Hectare.

Calculating Object Heights
As with calculating scale, there are multiple methods to determine the height of tall objects (e.g. trees or buildings) in aerial photos. In single aerial photos the two primary methods are the relief/radial displacement method and the shadow methods.
Relief/Radial Displacement Method
The magnitude of the displacement in the image between the top and the bottom of an object is known as its relief displacement and is related to the height of the object and the distance of the object from the principal point. This method can only be used if the object that is being measured is be far enough from the principal point to measure the displacement and the top and bottom of the object are visible in the photo.

Example: The length of a a displaced building is measured at 2.01 mm and the radial distance to the principal point is 56.43 mm. If the the flying height about the surface is 1220 m, what is the height of the building?

Shadow Method
If you can measure the length of a shadow and know the angle of the sun, the height of the object can be calculated using simple trigonometry.
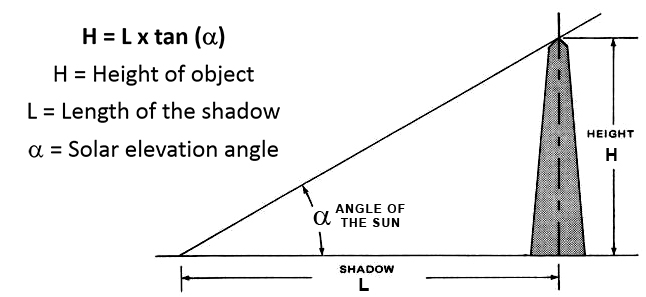
If you know when and where the aerial photo was taken you can determine the angle of the sun using the NOAA Solar Calculator. When using this calculator you want to use the solar elevation angle (El) for your calculations. This is the angle of the sun at the time and location specified.
