Lab 6: Acquiring and Processing Geospatial Data
Introduction
In this lab we will learn to how to download and work with Landsat data from the USGS “EarthExplorer” website. We will select scenes of interest, download and extract the data. We will learn how to use the tools in ENVI to open Landsat images and to subset images to a region of interest. In this lab we will acquire and visually compare two Landsat Level-1 scenes from Mt. St. Helens, one from 1980 shortly after the eruption and a recent image from this year. Finally we will work with our data in ArcGIS Pro to create a map which features both Landsat images.
Learning Outcomes
- Navigate “EarthExplorer”, create an account, learn how to select data and download geospatial data.
- Become familiar with different Landsat data characteristics and data availability
- Learn how to validate data, determine resolution, coordinate systems
- Learn how to extract and process data into different formats
- Learn how to import Landsat data in ENVI
- Learn how to subset and export raster files in ENVI
- Add and view Landsat imagery in ArcGIS Pro and create a map showing the two Landsat scenes
Background
EarthExplorer provides online search, browsing, metadata export, and data download for earth science data from the archives of the U.S. Geological Survey (USGS).
This includes a large archive of calibrated Landsat imagery. In this lab we will be searching for and downloading two Landsat scenes of Mt. St. Helens, Washington. The first scene we will look for will be from
Landsat 2 or 3 (Multispectral Scanner MSS) in 1980 just after the eruption on May 18, 1980. We will then download a recent Landsat 8 scene to compare. We will be downloading what is known as Level 1 data products.
About the data: The Landsat data we will be downloading in this exercise is known as Level 1 data. This data has been has not been radiometrically calibrated or atmospherically corrected. Learn more about Landsat Level-1 data. The Level-1 data is standardized and conforms to the following:
- GeoTIFF output format
- Cubic Convolution (CC) resampling method
- 30-meter (TM, ETM+, OLI) and 60-meter (MSS) pixel size (reflective bands)
- Universal Transverse Mercator (UTM) map projection (Polar Stereographic projection for scenes with a center latitude greater than or equal to -63.0 degrees)
- World Geodetic System (WGS) 84 datum
- MAP (North-up) image orientation
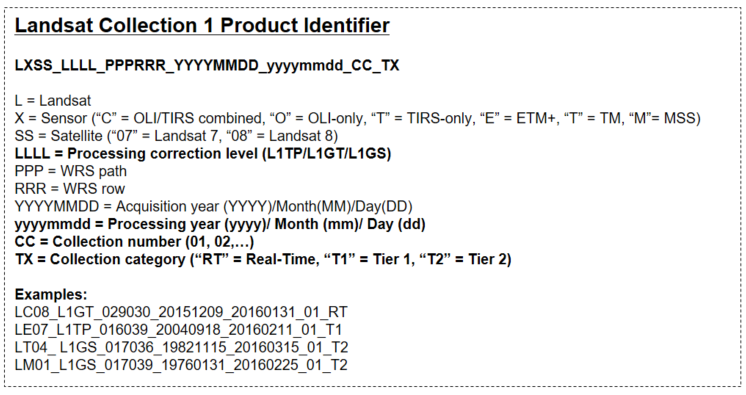
Landsat products downloaded from EarthExplorer have specific naming convention that describes the sensor, the location of the image, when it was acquired and processed.
Set up your Workspace
First we need to set up our workspace.
- Create a new folder on your desktop named “Lab_06”. Within the folder named “Lab_06”, create two subfolders as below:
Folder Structure (within Lab_06 folder):
- Originals
- Final
Acquiring Landsat Data
- Open up your favorite web browser and navigate to https://earthexplorer.usgs.gov/.
- Register for an account by clicking on "Register" in the upper right hand corner, it’s free and instant to create an account. You can skip this step if you already have an EarthExplorer account. Once you have created an account, go ahead and log-in.
- Now we are ready to select a location to search for data sets. For this lab we will be looking for Landsat Level-1 data for Mt. St. Helens. The first step is the “1. Enter Search Criteria”
to select the location and data range. You can narrow your search area by either typing in the “Feature Name” field, adding coordinates or dropping a marker on the map.
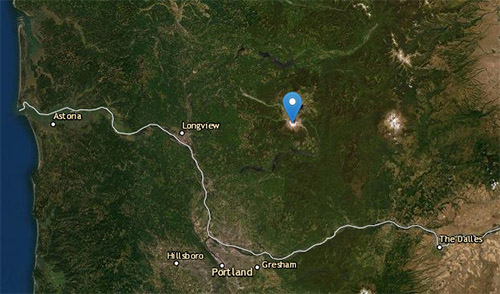
The coordinates for Mt St Helens are 46.1922, -122.1927.
You can also use the map interface to navigate to Mt .St. Helens and click the map to select an area of interest.
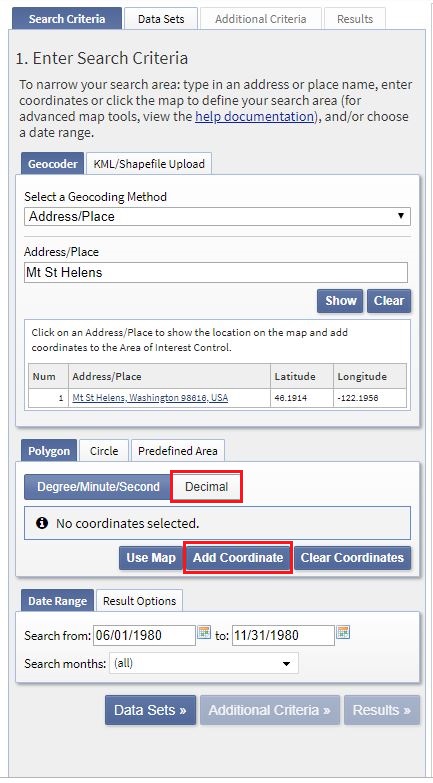
- Next we will select our date range we are interested in. First let’s look for a Landsat image from 1980 immediately following the eruption (Mt St Helens erupted on May 18, 1980). Search dates from 6/01/1980 to 10/31/1980.

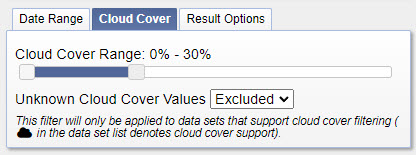
- EarthExplorer allows you to specify additional search criteria, including percent cloud cover. Click on the “cloud Cover" tab. We are interested in images with minimal cloud cover so input 0-30 in the Cloud Cover to only display images with less than 30% cloud cover.
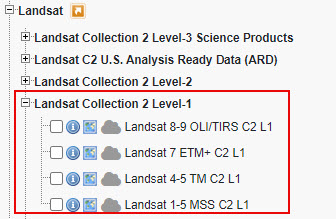
- Click on the “Data Sets” button to proceed to the next screen. Now you will see a list of all possible data sources. Navigate to the “Landsat” heading and click the “+” beside the name to expand the category. You will now see all Landsat Collection options, select Landsat Collection 2 Level-1. To find images from 1980, we will look under “Landsat 1-5 MSS” which stands for Landsat 1 - 5 Multispectral Scanner (MSS) sensor. Check the box next to “Landsat 1-5 MSS” to select this data set.
- EarthExplorer allows you to specify additional search criteria. Click on the “Additional Criteria” tab. Specify “Day” under the “Day/Night” as we only want Landsat images collected during the day.
- Click the “Results” button and you should see thumbnail images showing the data that match your search criteria. Click on the thumbnail of the Landsat image to see a larger image of the scene along with the Metadata for the scene. Click the foot icon to see the footprint of the scene on the map interface.
The Metadata & Browse option displays a preview of the image along with metadata for the image.
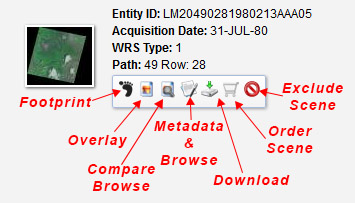
- Compare the images in your search results. Click the Overlay icon to see the selected Landsat image overlayed on the map. Some of the older Landsat imagery may be missing part of the image, so it is important to preview the coverage before downloading. Make sure Mt. St Helens is clearly visible in the image. Select the image that has the least amount of clouds and best quality for viewing Mt St Helens.
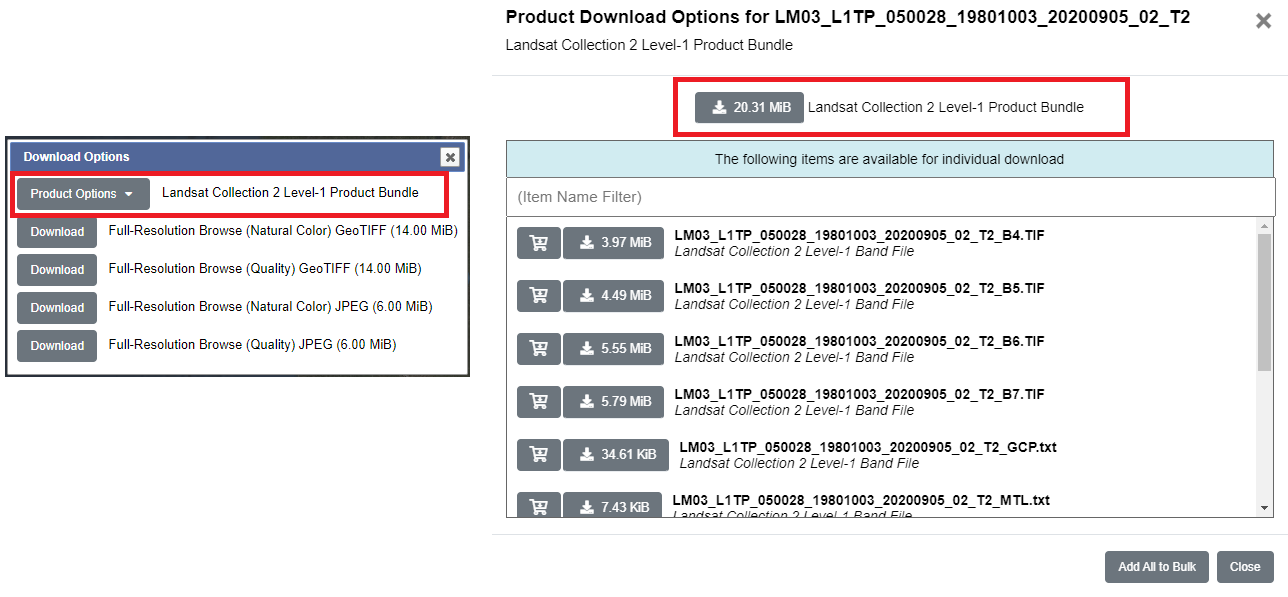
- Now we are ready to download the image. Click the “Download Data Options Icon”
 and select “Landsat Collection 2 Level 1 Product Bundle”. A new window will pop-up, in this window select the top button, Landsat Collection 2 Level 1 Product Bundle. The download should start soon, a new tab may open while the download is processing, if prompted choose to “Save File”. It may take a little while to download the file. You have to be logged-in to Earth Explorer to download the Level 1 data. Do not open the file.
- While you are waiting for the download, Start a QAQC Form for this dataset. Download the PDF and open in Adobe Reader to save your form. The second page of the QA/QC form contains information on how to fill out the form, note not all fields may be necessary. Use the Metadata available in Earth Explorer to help you start filling out the form. Any information not found in EarthExplorer can be researched and verified in ENVI after step 16.
- Now we will download a recent Landsat 8/9 scene of the same area. Repeat steps 5-11 changing the following information:
- Change the date range to 6/01/2025 to 10/31/2025
- Under the Data Set tab expand Landsat Collection 2 Level-1, select “Landsat 8-9 OLI/TIRS” (Landsat 8 & 9 Operational Land Imager/Thermal Infrared Sensor) and set the additional criteria filter to Day
Complete a QAQC Form for the 2025 data. You should have two QA/QC forms (Landsat image from 1980 and Landsat image from 2025).
Locate and Uncompress Downloaded Files
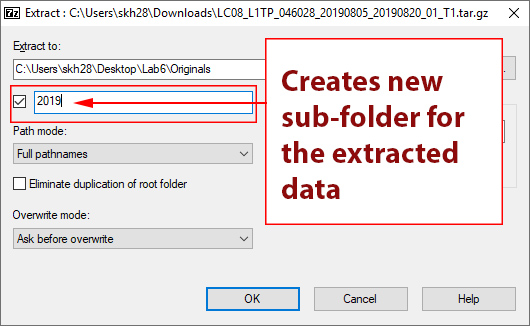
- Locate the files you just downloaded in your Downloads folder. The downloaded files are in a compressed format known as a tarball or tarfile ( .tar, .gz). You will need to use 7-Zip to unpack the files. Right click on the file you downloaded and select “7-Zip”, then select “Extract Files”. Under Extract to: select your Lab 6 Originals folder. Next to the check box below type the year of the data set you are extracting (i.e. 1980 or 2025). This will extract the data into a new sub-folder with the name you typed. Click OK. Make sure you extract the files into separate folders (one folder for 1980 data and one for the 2025 data).
- Repeat this process for the second data set, make sure each dataset is in a separate folder in your Originals folder.
- Navigate to your Lab 6 Originals folder. Click on the newly created folders (1980, recent), inside you will see a multiple files in your folder. The Landsat data is comprised of multiple separate image files (TIF files, one for each band), along with additional files that contain metadata (date and time, corner points etc.) and sometimes quality assurance files (BQA).
Opening and Viewing Landsat Data in ENVI
There are multiple ways to open the Landsat files in ENVI. You can open each data layer (TIF file) individually or ENVI has the capability to directly open, read and stack the Landsat Level 1 data imagery by opening the metadata file text file. This is the function we will be using in this lab. This process only works if all of the dataset files (metadata and associated TIFs) are located in the same folder.
![]()
- Start “ENVI (64-bit)”, we will first open the 1980 MSS Landsat image of Mt St Helens. Select File → Open As → Optical Sensor → Landsat → GeoTIFF with Metadata. Navigate to your Lab 6 Originals folder where you extracted your data. Find the folder with the 1980 MSS Landsat data and select the metadata text file (it will end in "_MTL.txt") and click open. Alternatively you can also select Open and navigate to your folder and find the metadata text file, it will have a .txt file extension and the file name ends in "MTL" and click open. Both processes accomplish the same results.
- You should now see the 1980 Landsat image of the Mt St Helens area. Note that this will be a false color composite, as we can't make a true or natural color composite because the Multi Spectral Scanner (MSS) only include two of the visible bands (Green and Red), the other two bands are NIR.
- Make sure Mt St Helens is clearly visible in your imagery. Locate and zoom in on Mt St Helens, use the Reference Map Link (View → Reference Map Link) to help you locate Mt St Helens. You can also use the "Go To" tool in the main toolbar to jump to the coordinates (46.1922, -122.1927).
- Right click on the file in the Layer Manager and select View Metadata. Review the metadata for any additional information needed to complete and verify the data for the QA/QC file for this data.
Create a Region of Interest (ROI) for Subsetting all Imagery
Now we will create a Region of Interest (ROI) centered around Mt St Helens and Spirit Lake (directly northeast of the Mt St Helens). We will use this ROI to subset our images to the same geographic extent. An ROI is a vector file that contains a collection of coordinates or vertices. These can be saved in ENVI as XML files or exported as Shapefiles. We will only be creating one ROI and will use the same ROI to crop (or subset in ENVI terminology) both Landsat images.
- Zoom in to an appropriate level, a scale ~ 1:250,000 is a good guideline. You see the scale by clicking on the scale window in the top menu and selecting "Use Map Scale". You can zoom in or select a predefined scale. Make sure you can view Mt St Helens and the surrounding area (use the go-to tool and coordinates provided in the beginning to the lab to navigate to the Mt St Helens)

- To create a new Region of Interest (ROI) click the Region of Interest (ROI) icon
 on the toolbar or right click on the 1980 Landsat file and select New Region of Interest. The ROI Tool window will now appear.
- Select the "Rectangle" option
 . Use the cursor to draw a rectangle to create a region of interest that is centered on Mt St Helens.
To complete the shape, press the Enter key, or right-click and select "Accept Rectangle". Until you "accept" the shape, it appears translucent and you can edit its size or vertices, or move it. Once accepted, the shape appears in solid color. Make your ROI roughly square shaped and make sure it includes Mt St Helens and the surrounding area covered in pyroclastic flow deposits (ash).
- We will save our ROI in XML format (.xml) and will use the same ROI to subset both of our Landsat images. By saving the ROI we will be able to use this ROI in ENVI after we close the session.
In the ROI Tool Window select File → Save As. Name the file "MtStHelens_Boundary" and make sure to save it in your Lab 6 "Final" folder. Click "OK" and ENVI will save the ROI. Close the ROI Tool Window. We are creating a single ROI to subset or crop all of the image. We will use the same ROI to clip/subset both images.
Subsetting Rasters with ROI
There are a variety of ways to subset or crop rasters in ENVI. You can use ROIs, vector files (shapefiles) and even other rasters to subset (or clip) files in ENVI. To subset an image in ENVI you will use the Save As function to select the file and apply the crop.
Subset the 1980 Landsat Image
- From the main menu select File → Save As → Save AS ENVI, NITF...
- Select the Multispectral Landsat image (the file name will start with "LM" and end in "_Multispectral", then click the Spatial Subset button below the input file selection window.
- A window will expand on the right and display a preview of the selected input file. Click the Subset by ROI icon and select the Mt St Helens Boundary ROI and click OK. Click the OK button in the Data Selection window.

- In the Save File As Parameters window, select ENVI as the output format, leave the default data ignore value. Name the output file as "MtStHelens1980.dat" and save the file in your Finals folder.
- The newly subsetted raster MtStHelens1980.dat should automatically appear in your viewer. Confirm that the subset process worked correctly, uncheck the original (full extent) Landsat image in the Layer Manager. You should now only see the subsetted (clipped) Landsat image that is focused on Mt St Helens.
Subset the Landsat 8/9 Image
- Open the Landsat 8/9 image of Mt St Helens by opening the metadata text file (_MTL.txt).
- You should now see a recent image of Mt. St Helens in your viewer. By default ENVI displays Landsat 8/9 images in true color. The image may look dark, you may adjust to brightness if you like. The contrast will improve
- Now we will subset out Landsat 8/9 image using the same MtStHelens Boundary ROI file we created in step 23. From the main menu select File → Save As → Save AS ENVI, NITF...
- Select the Multispectral Landsat 8/9 image as the Input File (the file name will start with "MTL_LC08" and end in "_Multispectral"). Click the Spatial Subset button below the input file selection window.
- A window will expand on the right and display a preview of the selected input file. Click the Subset by ROI icon and select the MtSt Helens Boundary ROI and click OK. Click the OK button in the Data Selection window.
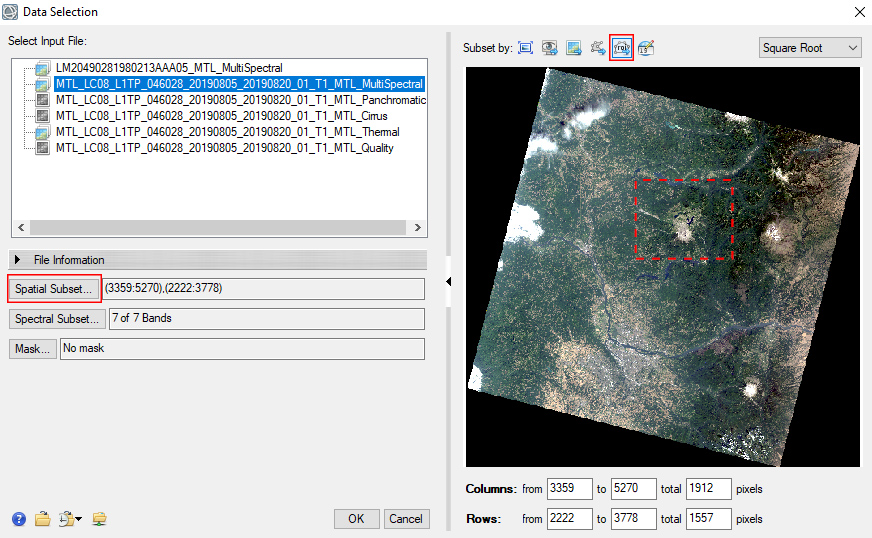
- In the Save File As Parameters window, select ENVI as the outpost format, leave the default data ignore value. Name the output file as "MtStHelens 2023.dat" and make sure to save the file in your Finals folder.
- The new subsetted raster should automatically appear in your viewer. Remove the original Landsat images and ROIs from the Layer Manager by right clicking on the files and selecting "Remove". Now only the subsetted images should be visible. Both images should cover the exact same geographic area.
- Change the Landsat Mt St Helens image to a NIR false color composite using using the Dynamic Band Selection tool. The Dynamic Band Selection controls appear at the bottom of the Layer tab when a raster file is open. Navigate to the Layer tab in the lower right hand corner and select the Color Infrared preset band combinations from the list. Use the Blend, Flicker and Swipe tools to animate the layers to see visually see the differences between the two images.

- Once you are done comparing the images close ENVI.
Create Map in ArcGIS
In the final steps we will use ArcGIS Pro to create a map that features the 1980 and current Mt St Helens satellite images side-bu-side. The data frame sizes and arrangements below are general guidelines. Feel free to deviate slightly on the frame size and map size depending on your images and arrangement. No matter the sizing, the two images should be set at the same extent and scale.
- Start ArcGIS Pro. Select a new Map Template and create a new project named Lab6-MtStHelensMap (or something similar) in your Lab 6 Finals folder for the lab, uncheck the box so a new folder isn't created.
- Let’s make sure ArcPro knows where your files are located. In the Catalog Pane, expand Folders and see if your data folder is shown. If not, don’t worry – your files are still where you left them! Right click on Folders and select Add Folder Connection. Add your GSP 216 folder or Lab 6 as a folder connection. Once you’re connected to your folder, you’re ready to add data to your map.
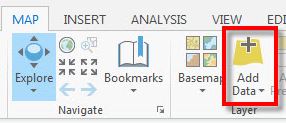
- Click the Add Data button (Map > Add Data) or drag the satellite image from your the Catalog pane into the map. Start by adding the 1980 Landsat image. Say yes to calculating statistics and pyramid layers if prompted.
- Verify that your image is focused on Mt St Helens then remove the default basemap layers (World Topographic and World Hillshade) from your map.
- Rename the Map by left clicking once where is says "Map" in the Table of Content and updating the map name to 1980. You can also rename the map in the Catalog view under Maps or by right clicking where it mays Map and selecting Properties and updating the name in the Map Properties Window.
- Add a second Map to your project by clicking on the Inserts tab → New Map. This will add a new map to your project. Rename the map to " 2025".
- Add the recent 2025 Landsat image to this map either using the Add Data button or dragging the data in from the Catalog pane.
- Now we will prepare the map layout. From the Insert tab select → New Layout to add a layout to your project. Select a Landscape Letter 8.5" x 11" paper size and press OK.
- To add a map frame to your layout, click the Map Frame button on the ribbon. From the drop-down, Under 1980 select the Default Extent then click on the empty map page. You will now see a rectangle with the default map.
- Change the size of map frame by either right clicking on the map or right clicking on the frame in the map and selecting "Properties". In the Map Frame Properties window under the Placement tab set the size to 5 inch x 5 inch.
- Repeat steps above and add the 2025 Map Frame to the layout and adjust the size.
- Right click on the 1980 Landsat images in the Table of Content and select Zoom to Layer. Then use the Map options under the Layout ribbon to adjust the zoom and extent of the image. Try to center the map frame on Mt St Helens and make sure you are zoomed in enough so the image fills the entire frame (no white space). You may adjust the size of the frame slightly to better for your data.
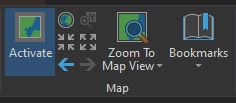
- When you are satisfied with the 1980 image, we will match the 2025 map frame so it covers the same exact geographic area at the same scale. Right click on the 2025 map frame and select Properties. Under Display Options change Constraint to Linked map frame center and scale. The other map frame should be listed as the reference Map frame underneath. Now both of your map frames should cover the exact same area and have the same scale. When you move around the 1980 image or zoom in and out the 2025 map frame will move to match (linked).

- Change the band combinations so both of the images are the same false color composite. Change the band combinations of the Landsat image by clicking on the Red, Green, Blue colors by the file name in the Table of Contents and selecting the bands.
- For the 1980 image use one of the two following false color composites:
NIR False Color Composite: Red - Band 6, Green - Band 5, Blue - Band 4 or Natural Color False Color Composite: Red - Band 4, Green - Band 6, Blue - Band 5.
- For the recent image use one of the following false color composites:
NIR False Color Composite: Red - NIR Band 5, Green - Red Band 4, Blue - Green Band 3 or True Color or Natural Color False Color Composite: Red - SWIR 1 Band 6, Green - NIR Band 5, Blue - Red Band 4 or True Color.
- Now we will make the final visual adjustments to the images. Click on one of the Landsat images in the Table of Contents. From the main toolbar you will see a Raster Layer tab now visible, select Appearance. Here you can also change the band combinations and adjust the brightness, contract and other settings under the Enhancement tools. Use the tools to fine tune your images as you see fit (or leave as if the image look good already).
- Now add the appropriate cartographic element, including Titles, Labels, Scale bars and North arrow. These can all be found under the “Insert” menu in the Layout View. Below is an example, your map should have different years. Also include the data sources and map author.
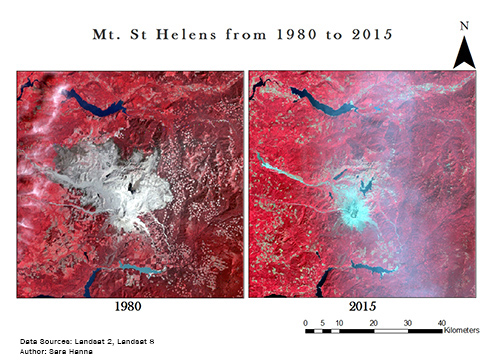
- When you are happy with your map export it to a PDF. Click on the Share tab from the main menu and select “Export Layout”. Select PDF as the type and make sure the resolution is set at 300dpi and save it in your “Final” Lab 6 folder. Save your map project in your final folder. Back-up your data by zipping the Lab 6 Final folder and transfer to a flash drive or Google Drive.
Lab 6 Turn-In
-
Upload your Two QA/QC forms for the two Landsat datasets to Canvas.
Upload your PDF map you created which should include the following:
- 1980 and recent Mt St Helens Subsetted Landsat Images. Images should be the side-by-side, with the same size data frame and scale.
- Title
- Scale Bar
- Labels (1980/ 2025)
- North Arrow
- Credits - Data source and map author
Extra Credit (5 points)
- Locate a per-eruption image (before May 1980) of Mt. St. Helens. Subset and format the pre-eruption image the same as the other two images and create a map with all three images, pre-eruption image, post-eruption and current image. You may change the sizes of the data frames and paper size to arrange the three images (no QA/QC form required). This is worth 5 points extra credit.


