Photogrammetry is process of making measurements from photographs. In this lab we will become familiar with the basic photogrammic techniques. We will use digital aerial photographs to take measurements and calculate scale, distance and areas of features in the photographs.
In today’s lab we will be using digital aerial photos to take our measurements. We will use GIMP (GNU Image Manipulation Program) to open up various aerial photos and take measurements using the “measure” tool. GIMP is a free, open-source image editing software available for download. GIMP is available through VLab.
The Lab 4 Worksheet can be downloaded on Canvas and the associated data is available through Google Drive.
First we need to set up our workspace, transfer the data and open GIMP.
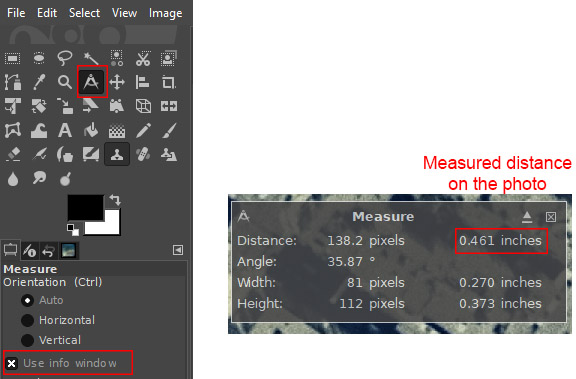
Watch the below video for some examples on how to measure distance in GIMP.
Scale is the ratio of the size of any object or feature or area within the photo to its actual size (i.e. 1 unit on the photo equals "x" units on the ground). Scale may be expressed three ways:

Example:
The scale of an aerial photograph is 1:15,000. In the photo you measure the length of a bridge to be 0.25 inches, what is the length of the bridge in feet in real life?

There are several methods for calculating the scale of an aerial photo. Which method you use depends on what information is already known.
One method is to use a feature of a known size (e.g. football field or standard event field) in the photograph to calculate the scale.
If you know the camera focal length and the flying height (above the surface) of the aircraft you can also determine the scale of a photo. For a digital aerial photograph you can use the same information to determine the ground sampling distance (GSD).
It is important to remember that areas have squared units. To determine rectangular area it is length x width, so if you measure both and convert these distances remember that if you are multiplying them together the resulting units are squared. For example, if an area is 100 meters by 500 meters, it is 50,000 square meters. Now if you wanted to change that number to square feet you wouldn't multiply by 3.28 (there are 3.28 feet per meter), you would multiply by 10.76 (3.28 x 3.28).
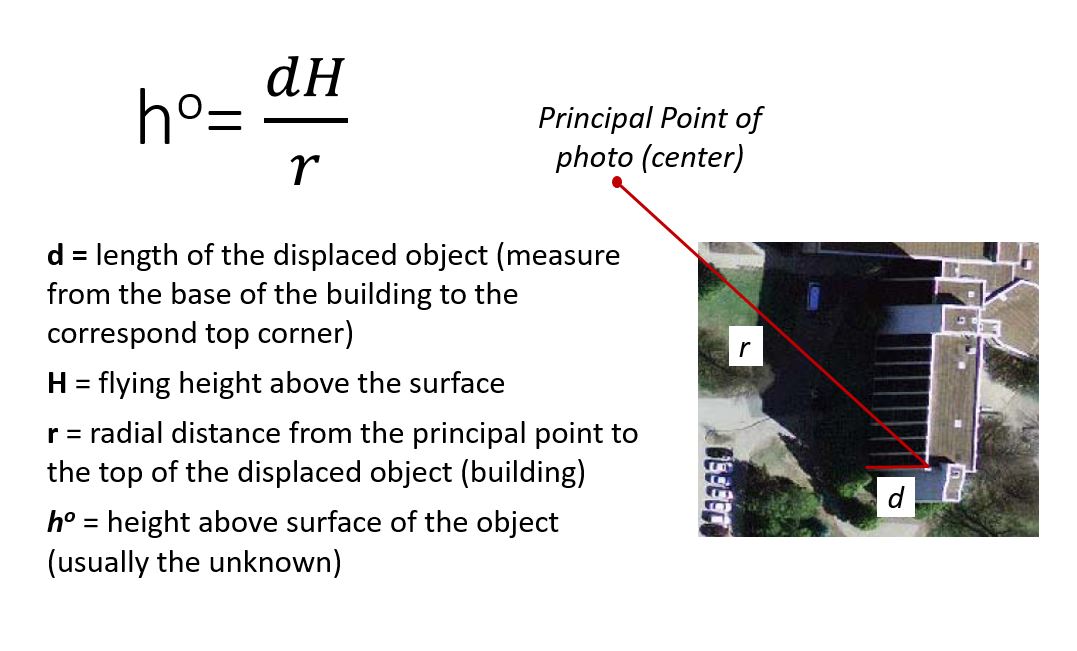
As with calculating scale, there are multiple methods to determine the height of tall objects (e.g. trees or buildings) in aerial photos. In single aerial photos the two primary methods are the relief/radial displacement method and the shadow methods.
The magnitude of the displacement in the image between the top and the bottom of an object is known as its relief displacement and is related to the height of the object and the distance of the object from the principal point. This method can only be used if the object that is being measured is be far enough from the principal point to measure the displacement and the top and bottom of the object are visible in the photo. When measuring d, think of it as measuring the height of the building from it's base to the corresponding top corner.
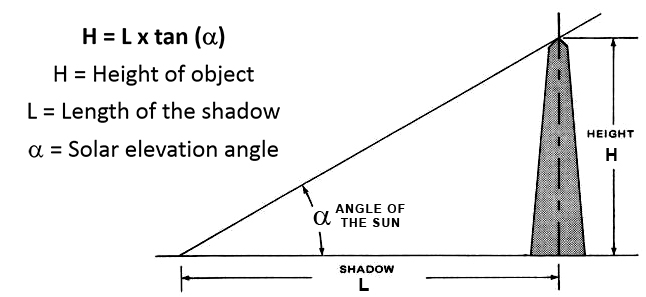
If you can measure the length of a shadow and know the angle of the sun, the height of the object can be calculated using simple trigonometry. If you know when and where the aerial photo was taken you can determine the angle of the sun using the NOAA Solar Calculator. When using this calculator you want to use the solar elevation angle (El) in degrees for your calculations, this is the last box on the right in the solar calculator.

© Copyright 2020 HSU - All rights reserved.