
| Introduction |
| Contents |
| Getting Started |
| Download |
| Navigating |
| Tutorials |
| Scripting |
| Advanced |
| About |
Projection Explorer Dialog
This dialog allows you to explorer different projection methods, their parameters, and the distortion they will add to spatial data. The dialog also will create a boundary layer that can be used to clip spatial data before it is projected. This prevents layers from having extreme distortions.
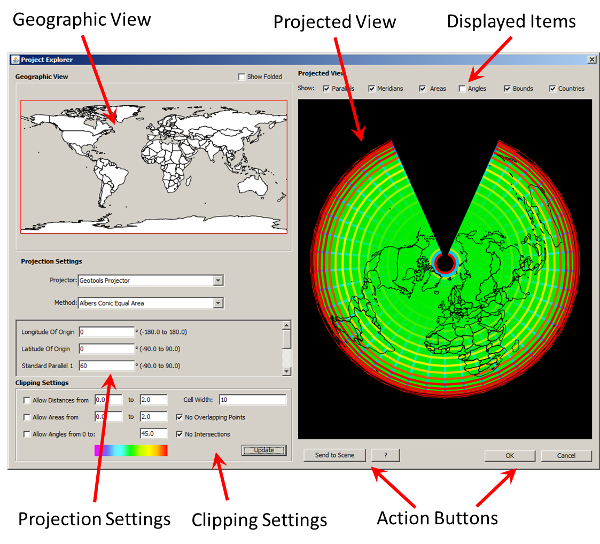
Geographic View
This view shows a view of the geographic space and also a layer showing the countries of the world for reference. After an "Update", this area will also show the boundary for the data based on the current settings.
Show Folded: The bounding area can "wrap around" the earth sometimes and checking this box will show the bounding area wrapping back around.
Projection Settings
Projector: You can select from up to three projection engines to use for projecting data. Each has different projection methods.
Method: After you select a projector, this popup will show the available projection methods. Once you select a method, the settings for the projection method will appear in the box below.
Clipping Settings
Allow Distances from: This sets the range of distances that will be allowed and how they will be colorized in the "Projected View". The settings represent the allowable proportion for distances from their original distances on the earth. Thus, 0 is the minimum as distances can only be reduced to 0 of their original size. There is no maximum but ranges between 1.1 to 20 are interesting to view but for any distance sensitive applications, you'll want to use distances between .9 and 1.1. Distances only constrain the bounding area if the check box before "Allow" is checked.
Allow Areas from : These settings are similar to the distance ranges in that you can have areas included that are reduced to the minimum value or up to the maximum value. The minimum allowed is 0 while there is no maximum. If you are using area-senstive analysis, you'll want to choose values near 1 (i.e. .9 to 1.1). Area calculations only constrain the bounding area if the check box before "Allow" is checked.
Allow Angles from: This value sets an upper limit on the maximum distortion for each of the angles in a cell. Perfectly rectangular cells will have corners that are all at 90 degree angles. The distortion specified here is either from the angles shrinking or expanding so there is only one value. If any angle varies from 90 degrees by more than the value specific, the cell will not be included in the boundary. Angles only constrain the bounding area if the check box before "Allow" is checked.
Cell Width: This is the width of the cell used to compute the boundary in degrees. 10 will allow very fast calculations of the boundary and distortions but is not as accurate as smaller cell sizes. Increasing the cell size will slow down the calculations considerably.
No Overlapping Points: Some projection methods can have data overlap on itself. This is typically not desired so normally, you'll want to leave this check box checked.
No Intersections: Similar to overlaps, having the boundary of an area you're going to project intersect with itself is typically not desired so you'll want to leave this check box checked as well.
Color Ramp: The color ramp at the bottom of the dialog shows how the various distortions will be visualized going from green to violet for distortions that reduce the area or distance and going from green to red for distortions that increase the area, distance, or angle distortions.
Update: Clicking this button will compute a new boundary and set of distortions based on the Projection Settings and the Clipping Settings.
Projected View
This area shows a projected view of the countries, boundary, and distortions in the data. The check boxes will make the various layers visible or invisible.
Displayed Items:
Parallels: Controls visibility of the lines of longitude that are colorized to show distortion from north to south.
Meridians: Controls visibility of the lines of latitude that are colorized to show distortion from east to west.
Areas: Controls visibility of the contents of the cell which show the area distortion.
Angles: Controls the points at the intersection of the parallels and meridians which show the angular or "conformal" distortion.
Boundary: Controls visibility of the "boundary" that is computed that fits within the desired distortion limits.
Countries: Control visibility of the country layer.
Action Buttons:
Send to Scene: Clicking this button will send the layers shown in the "Projected View" to a new Scene in BlueSpray. You will need to add a new view to the scene to see the layer. Then, the rendering options for the layers can be edited.
Help: Brings up this help page.
OK: If this dialog is accessed to define a projection transform, the settings defined here will appear in the transform. Otherwise, this button just exits the dialog
Cancel: Just exits the dialog.