Structure of a CanvasMap Web Page
If you look at the HTML file in the previous tutorial, you'll see there are a number of sections to the web page. The sections are identified with HTML comments in the previous tutorial and outlined below.
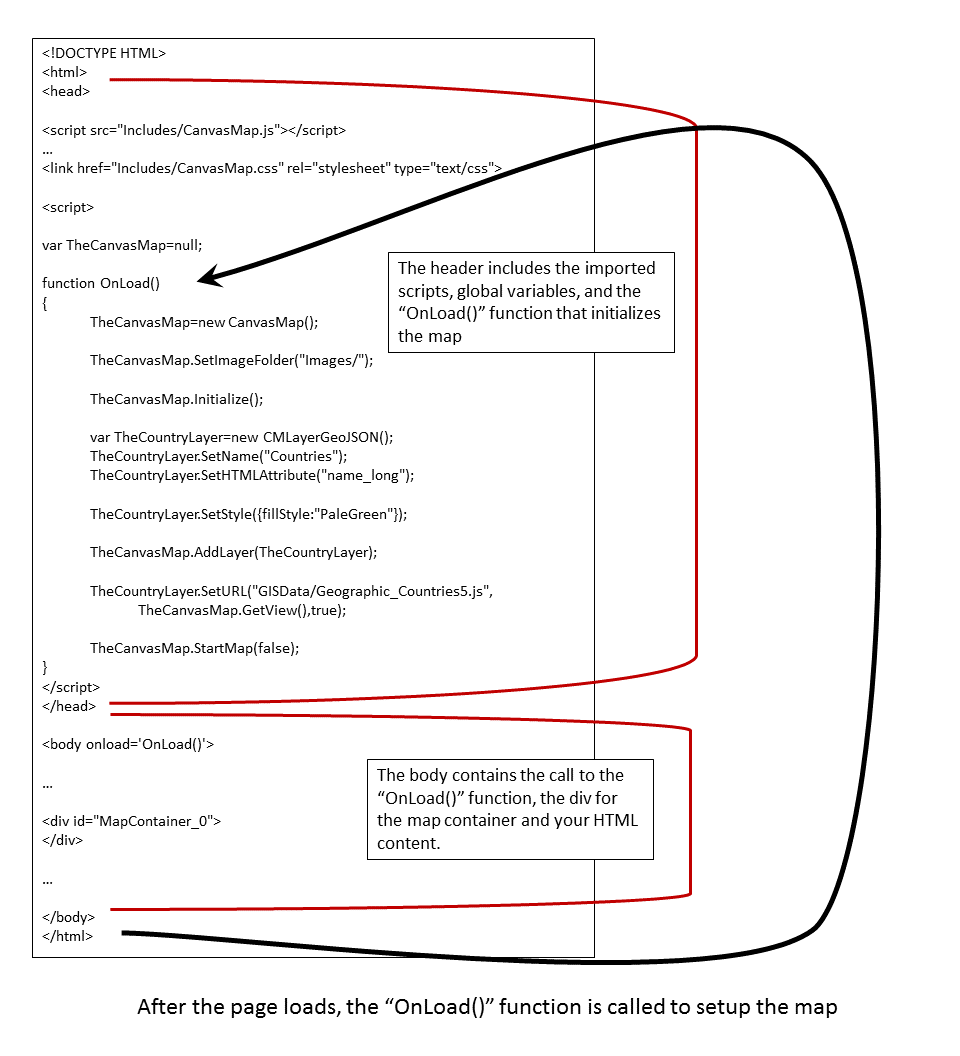
Most of the action is in the "OnLoad()" function. Below is a diagram showing what is happening in each section:
Script Imports
The scripts include the CanvasMap library, other libraries, and will include your own code files in the future. Each file contains a single "class" that encapsolates related functions and variables. The standard CanvasMap classes:
- CanvasMap - main class that includes the other objects for a CanvasMap
- CMUtilties - miscellaneous utiliteis that are used in mulitple classes in CanvasMap. Checkout the reference documentation on the functions included as you may find some handy functions for things like converting colors.
- CMDialog - creates HTML "dialog" boxes for settings.
- CMDialogSettings - the settings dialog. If you use a minimal map without the layer list, you can remove this.
- CMView - a view into a scene. This includes functions to zoom and pan the map.
- CMScene - a scene contains the layers for the map.
- CMLayer - this is the base class for all layer types.
- CMLayerGeoJSON - a class to create layers from GeoJSON data
As you use additional classes within CanvasMap, you'll need to include them into your HTML file.
CanvasMap is relliant upon several open source libraires as well:
- jQuery - used for cross-browser DOM access
- hammer - provides support for "gestures" in mobile devices
- Chart (ChartJS) - used in the examples to display animated charts
CSS Files
There is only one CSS file for CanvasMap, CanasMap.css. You'll want to make copies of this file when you customize the look of a CanvasMap.
OnLoad Function
The OnLoad() function is added to the "body" tag for the web page and this functoin is then called after all the body content has been loaded. This ensures that all your HTML tags have been converted to DOM elements so they can be access from JavaScript. The OnLoad() function is used to setup and customize your CanvasMap.
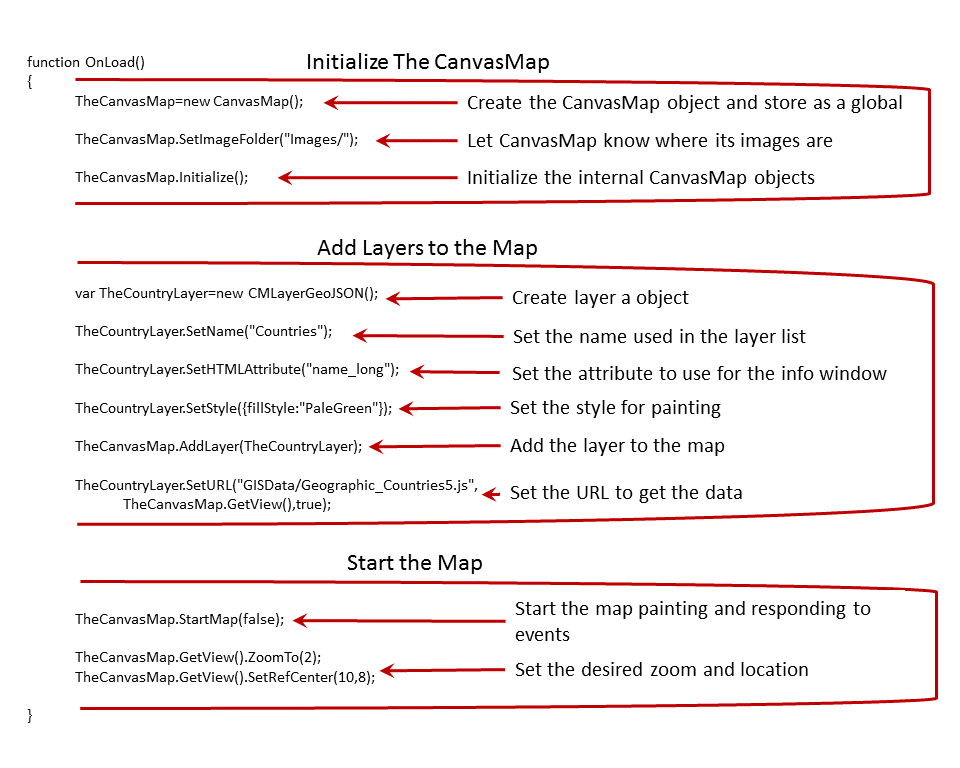
Initializing the map
Take a look at the "OnLoad()" function and you'll see code to initialize the map, add layers, and start the map. Note that you cannot add layers to a map until after the map is initialized.
The code below will:
- Create the CanvasMap object and save it to the global variable
- Set the location of the images folder. This tells CanvasMap where to find the images. The current setting should work as long as you have your maps stored in the "CanvasMap" folder. If you move them, you'll need to update the image folder.
- Initialize the CanvasMap. The "Initialization()" function sets up the internal state of the CanvasMap so we can add layers to it.
TheCanvasMap=new CanvasMap(); // creates the map object

TheCanvasMap.SetImageFolder("Images/"); // lets CanvasMap know where the images are

TheCanvasMap.Initialize(); // sets up the view, scene, and event handlers for the map
Adding Layers
The code below adds a layer to the map. "CMLayerGeoJSON" displays polygon and linestring (i.e. polyline) data in the map. There are other layer types we'll learn about in future tutorials. This code takes the following steps:
- Create the layer
- Give the layer a name which will appear in the layer list
- Set the style of the layer to be filled with "PaleGreen"
- Add the layer to the CanvasMap
- Set the URL for where the data is located. Note that we also send the layer the "CMView" that is within the CanvasMap (more on this later) and a flag "true" indicating we want CanvasMap to "ZoomTo" this layer after it is loaded. Note that if you are running without a server and used the "Set Data" page, you'll have a "SetData()" function instead of the "SetURL()" function.
var TheCountryLayer=new CMLayerGeoJSON();

TheCountryLayer.SetName("Countries");

TheCountryLayer.SetStyle({fillStyle:"PaleGreen"}); // fill the data with pale green color

TheCanvasMap.AddLayer(TheCountryLayer);

TheCountryLayer.SetURL("GISData/GoogleMercator_Countries_100m.js",TheCanvasMap.GetView(),true);
Note that the "SetURL()" functoin is the last call. This is important if you provide "true" as the last parameter. The "true" will tell CanvasMap to "ZoomTo" the contents of that layer as soon as it is loaded. If this happens before the layer is added to the map, the bounds for the scene will be incorrect.
Starting the Map
The next step is just to call "StartMap". We have specified a flag of "false" to keep CanvasMap from resizing the map to fit the browser window as the default is to create a resizable map (more on this later).
TheCanvasMap.StartMap(false); // don't resize
Zooming To an Area
The last step is to zoom to the area of interest. This has to be after the "StartMap()" function call so that the width and height of the CanvasMap has been resized.
 // Zoom to a particular area of the map
 TheCanvasMap.GetView().ZoomTo(2);
 TheCanvasMap.GetView().SetRefCenter(10,8);